Jekyll2024-04-22T14:27:53-07:00https://gkorpal.github.io/feed.xmlGaurish KorpalMathematics Graduate StudentGaurish Korpalgkorpal@math.arizona.eduhttps://www.math.arizona.edu/people/gkorpalLearning Computer Science Basics2022-07-01T00:00:00-07:002022-07-01T00:00:00-07:00https://gkorpal.github.io/posts/2022/07/csbasicsCypherpunks write code (A Cypherpunk’s Manifesto - Eric Hughes, 1993). Therefore, I want to work through the various problems from Project Euler and Cryptopals. However, I can’t code proficiently in any language.
The past
In the past, I have dabbled into programming using different languages:
Unfortunately, I never spent time on honing my programming skills. Therefore, at the beginning of my graduate school, I thought of properly learning programming in Python. However, most of the study materials I found were more about “writing code to solve data science problems” rather than “learning to solve problems using programming.”
The present
I spent one year learning the basics of computer science following the advice from UArizona Computer Science department students and professors. None of the textbooks were read cover to cover.
Topic
Textbook
Complementary Material
Supplementary Material
Programming
How to Design Programs by Felleisen, Findler, Flatt, and Krishnamurthi (2nd edition)
Structure and Interpretation of Computer Programs by Abelson, Sussman, and Sussman (Wizard book, PDF edition, Brian Harvey’s lecture notes and videos); Harvard CS 50; UC Berkeley CS 61A lecture notes
Algorithms
Introduction to Algorithms by Cormen, Leiserson, Rivest, and Stein (3rd edition)
Online Resources; Problem Solving with Algorithms and Data Structures using Python by Miller and Ranum (HTML edition); Introduction to Algorithms by Manber
Algorithm Design by Kleinberg, and Tardos (slides); Algorithms by Sedgewick and Wayne; Algorithms Illuminated by Tim Roughgarden (Omnibus Edition); Algorithms by Jeff Erickson (PDF edition); Stanford CS 161 lecture videos; UC Berkeley CS 61B lecture notes
Systems
The Elements of Computing Systems by Nisan and Schocken (2nd edition)
Computer Systems: A Programmer’s Perspective by Bryant and O’Hallaron (online resources); Computer Organization and Design by Patterson and Hennessy; Operating Systems: Three Easy Pieces by Arpaci-Dusseau and Arpaci-Dusseau (PDF edition and Vutukuru’s lectures); Operating System Concepts by Silberschatz, Galvin, and Gagne (Dinosaur book); Basics of Compiler Design by Mogensen (PDF edition); Modern Compiler Implementation in ML by Appel (Tiger book); Compilers: Principles, Techniques, and Tools by Aho, Lam, Sethi and Ullman (Dragon book); Crafting Interpreters by Nystrom (HTML edition); Engineering a Compiler by Cooper and Torczon (2nd edition); UC Berkeley CS 61C lecture notes and videos
Networking
Computer Networks: A Systems Approach by Peterson and Davie (5th edition)
creating programming projects related to my thesis
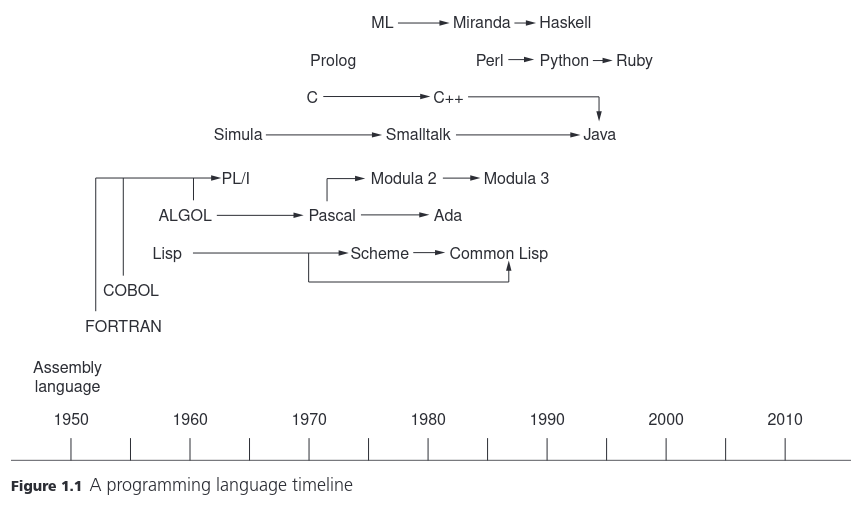
However, there are many more programming languages to choose from. For example, following are some of the main programming languages developed before the Internet age (source: Programming Languages - Principles and Practice, by Louden & Lambert, 3rd ed)
Eventually, I would also like to learn Rust, and participate in Capture The Flag (CTF) competitions like CrytoHack, TryHackMe and HackTheBox (Kali Linux).
]]>Gaurish Korpalgkorpal@math.arizona.eduhttps://www.math.arizona.edu/people/gkorpalReading and annotating papers2021-03-15T00:00:00-07:002021-03-15T00:00:00-07:00https://gkorpal.github.io/posts/2021/03/tabletFollowing is the comparison of tech specs of my new tablet (USD 315 + taxes) with the older tablet (USD 280 + taxes):
Specification
Samsung Galaxy Tab S6 Lite
Asus Google Nexus 7 (2nd generation)
CPU
Samsung Exynos 9611 (2.3GHz x 4 cores, Cortex-A73 + 1.7GHz x 4 cores, Cortex-A53)
Qualcomm Snapdragon S4 Pro APQ8064 (1.5GHz x 4 cores, Krait 300)
iGPU
Arm Mali-G72 (850MHz, Bifrost)
Qualcomm Adreno 320 (400MHz, Ardeno)
RAM
2 x 2GB LPDDR4X
2GB DDR3L
Storage
64GB eMMC
32GB eMMC
Battery
7040 mAh (fast charging)
3950 mAh (supports wireless charging)
Ports
3.5mm headset jack, Type-C USB 2.0 and microSD card slot (upto 1TB)
3.5mm headset jack and SlimPort (microUSB)
Network
WiFi (802.11 a/b/g/n/ac 2.4+5GHz) and Bluetooth 5.0
WiFi (802.11 a/b/g/n 2.4GHz+5GHz), Bluetooth 4.0 and NFC (Android Beam)
Audio
AKG dual speakers (Dolby Atmos)
Sterio speakers (Fraunhofer Cingo)
Display
10.4” 2000x1200 WUXGA+ 225ppi Wacom digitizer LCD
7” 1920x1200 WUXGA 323ppi 10 finger multi-touch LCD with scratch resistant Corning Fit glass
Camera
8MP rear-facing with auto focus and 5MP front-facing with face unlock support
5MP rear-facing with auto focus and 1.2MP front-facing
Android 4.3 Jelly Bean, upgraded till Android 6 Marshmallow (apps were supported till 2019)
Warranty
1 year
1 year
Bottomline
Comes with S Pen which magnetically sticks to the edge of the tablet (Wacom’s battery-free EMR pen with 4096 pressure level sensitivity)
Designed for portability, can even fit in big pockets. Could easily annotate PDF using Adobe reader and fingers.
Additional accessories
Official Book Cover (USD 32) and S Pen nib replacement kit from Note 10 box (eBay, USD 10)
Official Travel Cover (USD 31)
The Nexus 7 is one of the best piece of hardware I ever owned, but it lacked good quality acccesories. Moreover, in my opinion, Samsung Galaxy Tab S6 Lite is a modified version of Samsung Google Nexus 10 with added Wacom drawing tablet functionality, reduced screen resolution, and removed camera-flash (full comparison). On the other hand, Samsung Galaxy Tab S series in general have filled the void left by Google Pixel C after Google dumped Android in favor of ChromeOS tablet Google Pixel Slate which supported Pixelbook Pen (Wacom’s AAAA-battery AES pen).
Initially, since reading was the main purpose of the tablet, I tried replacing my older tablet with Kindle Paperwhite (3rd generation). However, its small screen made it impossible to quickly jump between the pages of the large documents. Moreover, to be able to read pdf/DjVu files properly, one first has to optimize them for viewing using k2pdfopt or jailbreak kindle (complicated). Another adavantage of using a tablet PC instead of an e-reader is that nowadays there are many open source online textbooks available, like The Stacks project and nLab.
Purpose
Old tablet app
New tablet app
PDF reader and annotator
Adobe Acrobat Reader
Xodo PDF Reader & Editor
Sync folder with Google Drive
FolderSync
Autosync for Google Drive
Adblocker for in-app ads (including Chrome, not YouTube)
Took some time to get used to writing on bigger screen than Nexus 7.
Settings > Display > Navigation bar > Swipe gestures > Swipe from sides and bottom
Also, enable “Block gestures with S Pen” and in Xodo app enable “Stylus as Pen”
Cons: low resolution, speakers position only good for landscape viewing, front camera is only good for portrait use.
]]>Gaurish Korpalgkorpal@math.arizona.eduhttps://www.math.arizona.edu/people/gkorpalHigher Arithmetic Computations2021-01-11T00:00:00-08:002021-01-11T00:00:00-08:00https://gkorpal.github.io/posts/2021/01/higher-arithmetic-computationsIn this post I discuss the options available for doing computational experiments in advanced number theory.
The free rein of proprietary softwares
In the world of mathematical computations, proprietary softwares tend to more adavnced than the open source alternatives. This is mainly because of the lack of industrial support, i.e. nobody can make money by having a better abstract math computation system. Following is the list of current market leaders and their open-source competitors/clones:
Structural computations (specialized CAS for mathematical structures from abstract algebra, algebraic geometry and finite incidence geometry)
SageMath (FLINT, cyPARI, GAP, Singular, Polymake, CoCoA, Giac, … glued together using Python)
CyPari2 + ??
For a more up-to-date information, have a look at the ICMS proceedings.
I must point out that RStudio is the only open source alternative which has been able to overtake the proprietary alternatives, mainly because statistical computations can help you make money. Moreover, though the Anaconda distribution has become the standard open-source alternative to all properitary computational softwares, there still isn’t any Python library for “structural computations” (Galois representations, isomorphisms, counting points on varieties, etc.). I believe that this is because SageMath’s motto “building the car instead of reinventing the wheel” turned it into a bloatware since they integrated other well developed open source programs like R, FriCAS, Maxima, and SymPy using Python (the glue language of scientific computing), instead of just building the Python libraries (like CyPari2) which would act as an alternative to Magma, fulfilling the original motto “Software for Arithmetic Geometry Experimentation”. To overcome this failure, SageMath evolved into cloud based subscription service called CoCalc to generate revenue for funding the massive project. Howevever, the main contributions seem to be coming from the developments related to the LMFDB project. It might also be useful to look at the ANTS proceedings.
Mix and match
Open source softwares have been a life saver for students in countries like India, where our universities couldn’t afford the proprietary softwares. I myself learned numerical analysis on GNU Octave and number theory on SageMath. Note that, there exist computer algebra systems which follow the philosophy of accepting a given general-purpose programming language and extend it by a set of algebraic capabilities:
People have tried achieving this in many other programming languages, but all of them are half-baked due to the lack of contributors. In fact, using GiNaC we can get a symbolic extension for GNU Octave (nowadays can also use SymPy) and its fork Pynac provides the backend for symbolic expressions in SageMath (before that Maxima was used). Moreover, SymEngine is planned to be used as an optional fast symbolic core for SymPy since it is much faster than Pynac and a bit faster than GiNaC. However, for doing computational experiments in higher arithmetic we will have to learn multiple languages:
Any mathematician who is serious about doing extensive computational work in algebraic number theory and arithmetic geometry is strongly urged to become familiar with all three systems [Sage, Pari and Magma], since they all have their pros and cons. Pari is sleek and small, Magma has much unique functionality for computations in arithmetic geometry, and Sage has a wide range of functionality in most areas of mathematics, a large developer community, and much unique new code. – SageMath October 2008 Bordeaux meeting
Python: General-purpose programming language (open-source)
During my undergraduate studies, I had the perception that C++ is “the langauge” for scientific computations. In fact, there are many C/C++ libraries for higher arithmetic computations, like NTL, FLINT, eclib, gf2x, Givaro, GMP, GNU MPFR, GNU MPC, ARB, CMH, LinBox, PARI, Symmetrica, zn_poly, and m4ri. However, with the advent of Cython (not to be confused with CPython, which is the original Python implementation), Python has become “the new langauge” for scientific computations. The key advantage of Python over C++ is that Python provides better code readability than C++ (like using whitespaces instead of curly braces). In fact, all these C/C++ libraries can now be accessed via SageMath using Python-based syntax. For example, in 2016, Robert J. Lemke Oliver used SageMath and C++ to verify the observations by Kannan Soundarajan, leading to the famous discovery of biases in the distribution of consecutive primes.
To begin the Python journey, we will need the following packages:
*Note that Fedora will automatically install the required dependecies like mpmath, Cython, matplotlib etc.
If you want GUI version of Python development environment then can get IDLE by installing the package python3-idle. We will use Vim as the text editor for writing Python scripts. Note that we don’t need to add a file extension, however for proper syntax highlighting we will use the file extension .py. Therefore, it would be helpful to install the python-mode plugin (instructions). Following are some the key mappings for some of the python-mode commands (documentation):
Auto-complete a word that has already been typed once in the document
Note that the text-wrap is disabled by default, with the maximum line length of 79 characters. Moreover, it uses pylint to check code at every save. I couldn’t figureout how to use code completion via rope.
Therefore, though Python is an object-oriented language, it doesn’t imply that it doesn’t support other programming paradigms (wikipedia). Also, it would be wise to keep in mind the floating point arithmetic limitations that these general purpose programming languages. For example, if using Python as a calculator, we will get “wrong” answers when using decimals:
# Python3 examples
>>>3.3-1.1# Do not depend on the exactness of floating point arithmetic, even for apparently simple expressions!
2.1999999999999997>>>0.1+0.2# so here 0.3 is not equal to 0.1 + 0.2
0.30000000000000004>>>format(.1,'.20f')# 0.1 does not has exact representation in binary floating point
'0.10000000000000000555'
# trying to bypass float arithmetic problem
>>>fromdecimalimport*>>>Decimal('3.3')-Decimal('1.1')Decimal('2.2')>>>Decimal('0.1')+Decimal('0.2')Decimal('0.3')>>>Decimal('0.1')==0.1False>>>Decimal('3.5')==3.5True
Magma: Domain-specific programming language (proprietary)
There exist individual C/C++ libraries, like FLINT and m4ri, which are much more efficient than Magma. In fact, Magma itself uses some of the C/C++ libraries like ATLAS, GMP, GMP-ECM, MPC, and MPFR. However, there aren’t enough libraries available to enable SageMath replace Magma completely.
In the USA, because of the Simons Foundation Agreement, you can get access to Magma for free by contacting your department’s IT support staff. You should be able to access its full-version on your department’s computer clusters and student-version on your personal computer (installation steps). Note that the student-version is available only for the outdated 32-bit architecture, therefore you might also need to install additonal packages like glibc.i686 in Fedora (details) or ia32-libs-multiarch in Ubuntu (details).
We will use Vim as the text editor for writing Magma scripts. Note that, just like for Python scripts, we don’t need to add any specific filename extensions to the text files in order to be able to “load them” in Magma (details). However, one can use filename extension .m to get Objective-C syntax highlighting (objc.vim) and to be consistent with the extension used for magma package files (details). Moreover, we can run the code without having to leave the text editor by adding the following to .vimrc file (source):
map<F2>:w<CR>:!magma %<CR> "once you press <F2>in normal mode, it first saves your fileand then run the file with magma.
imap <F2><Esc>:w<CR>:!magma %<CR> "once you press <F2>ininsertmode, it first leaves insertmode, then saves the fileand then run the file with magma.
One can learn the basics by going through the “First Steps in Magma” or skimming through the first chapter of the “Handbook of Magma Functions”, you will be ready to start using Magma for solving math problems. Note that Magma supports the old-school procedural programming paradigm with an ability to implement functional style.
Magma is an imperative, call by value, statically scoped, dynamically typed programming language, with an essentially functional subset.
Examples
For some elementary numer theory examples, see the Micro introduction into Magma available on the legacy website of Harvard University’s Department of Mathematics. However, we will take some examples from SageMath and solve them using Magma. Note that, unlike SageMath, Magma doesn’t have access to any plotting library like matplotlib. Therefore, we can’t reproduce the graphical examples we saw above.
Fortunately, the OSCAR project, supported by the German Research Foundation (DFG) since January 2017, has the potential of becoming an open-source Julia-based Magma. I believe that unlike SageMath, OSCAR will be able to replace Magma, since like Magma is maintained by the Computational Algebra Group at the University of Sydney, OSCAR is maintained by the Algebra, Geometry and Computer Algebra group at TU Kaiserslautern. Moreover, Julia has simple syntax like Python (Python equivalent is CPython: interpreted language for fast software development), is as fast as C++ (Python equivalent is Cython: compiled language for fast computations) and uses a LLVM just-in-time (JIT) compiler similar to the JVM JIT compiler of Java (Python equivalent is PyPy, similar to LuaJIT: dynamic language for fast computations).
In my opinion, the research papers funded by public taxes should be freely available (like free beer) and the softwares needed to do tax-funded research should also be freely available (like free speech). Recently, there has been a surge in researchers using SageMath or Python for doing computations in higher arithmetic. For example, this arithmetic geometry paper uses Python for computations.
]]>Gaurish Korpalgkorpal@math.arizona.eduhttps://www.math.arizona.edu/people/gkorpalDrawing graphs and diagrams using pdfLaTeX2020-11-07T00:00:00-08:002020-11-07T00:00:00-08:00https://gkorpal.github.io/posts/2020/11/graphs-and-diagrams-latexIn this post I have collected the options available for embedding vector graphics in LaTeX when using pdfLaTeX.
We can always use simple mathematical programs like GeoGebra for 2D and 3D graphs and drawing programs like Google Drawing for diagrams. These graphs and diagrams can be exported as png or jpg (raster graphics) and then inserted in pdf using graphicx package.
\usepackage{graphicx}%add images\graphicspath{{./figures/}}%images are kept in a folder under the directory of the main document.\usepackage{subcaption}%to add multiple subfigures.
However, for better integration into the pdf document we should be using vector graphics and it can be done with the help of following programs/packages:
For including 2D and 3D plots, we can use the pgfplots package. Read the documentation. First include the following in the preamble:
\usepackage{pgfplots}%draws function plots using pgf/tikz\pgfplotsset{compat=1.16}%running latest version of pgfplots\usepgfplotslibrary{external}%avoid recompiling unchanged graphs\tikzexternalize[prefix=./figures/]%images will be stored in a folder under the working directory to avoid recompling unchanged files
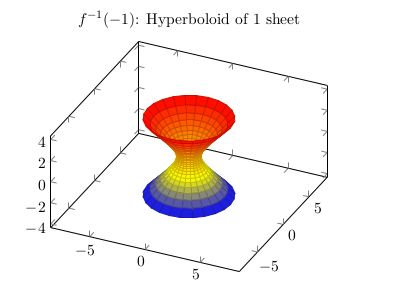
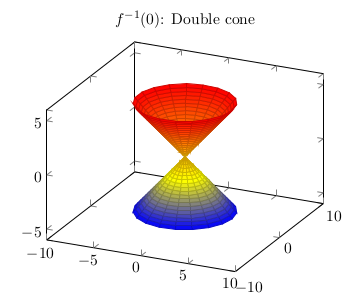
For example, we can plot 3D surfaces by following methods:
\begin{tikzpicture}%https://tex.stackexchange.com/a/359914/\begin{axis}[title=$f^{-1}(-1)$: Hyperboloid of 1 sheet,axis equal]
\addplot3[surf,domain=0:360,y domain=-2:2] ({cosh(y)*cos(x)},{cosh(y)*sin(x)},{sinh(y)});
\end{axis}\end{tikzpicture}
The downside of this method is that it will increase the compliation time if prefix option is not used (since pdfLaTeX is limited to single CPU thread). We can also use contour gnuplot and \addplot gnuplot to extend the built-in capabilities of pgfplots by means of gnuplot’s math library, although their use is optional.
Matplotlib
Another way of including 2D and 3D plots is to use the Python library Matplotlib. Read this guide. I will illustrate the steps involved by the following plotting the 2D vector field $X=-y\frac{\partial}{\partial x} + x\frac{\partial}{\partial y} and its flow lines:
Save and run the following Python scripts in the “figures” subfolder inside the folder containg the main LaTeX file (source1, source2):
importnumpyasnpimportmatplotlib.pyplotasplt#use quiver plot to plot the vector field
x,y=np.meshgrid(np.linspace(-5,5,10),np.linspace(-5,5,10))u=-yv=xplt.quiver(x,y,u,v)#save as pdf and pgf
plt.savefig('field.pdf')plt.savefig('field.pgf')
importnumpyasnpimportmatplotlib.pyplotasplt#use stream plot to create the flow lines
x,y=np.meshgrid(np.linspace(-5,5,10),np.linspace(-5,5,10))u=-yv=xplt.streamplot(x,y,u,v)#save as pdf and pgf
plt.savefig('flow.pdf')plt.savefig('flow.pgf')
Add the following lines in the preamble of the main LaTeX file:
\usepackage{pgf}\usepackage{import}%import images from different folder
Finally, to include pgf version of these plots in the document, use:
You can also use figure or center environment as per your needs.
We will get the following plots with proper font and resolution:
Alternatively, you can insert the pdf file by following this guide.
Diagrams
PGF/TikZ
Manually
Apart from all these tools, one can directly use TikZ package to manually draw things like flowcharts. Read the documentation for details. For example, we can add the following to the preamble:
\usepackage{tikz}\usetikzlibrary{shapes,arrows, chains, matrix, calc, trees, positioning, fit}\usetikzlibrary{external}\tikzexternalize[prefix=./figures/]%images will be stored in a folder under the working directory
\begin{tikzpicture}[>=latex']
\node[left] at (0,0) (input) {$p$};
\node[block] at (4,0) (block) [text=white]{\textbf{Reciprocity Law}};
\node at (9,0) (output) {$\chi_\tau(\Frob_p)$};
\draw[very thick, ->] (input) -- (block);
\draw[very thick, ->] (block) -- (output);
\end{tikzpicture}
Using GeoGebra Classic
The easiest way to include simple diagrams is to use GeoGebra, since it gives us the option of exporting the Graphics View as PGF/TikZ code. Installing GeoGebra Classic 6 is a dependency hell (ex1 and ex2). Therefore, we will just use the online version: https://www.geogebra.org/classic For example, add the following to the preamble:
\usepackage{pgf,tikz}\usetikzlibrary{arrows}%you can see what extra packages are needed by going through the exported tex file
Then draw the following diagram in GeoGebra
And add the following corresponding code in the tex file:
We can draw commutative diagrams using tikz-cd package. Read its documentation for details. Firstly you will have to add the following to the preamble:
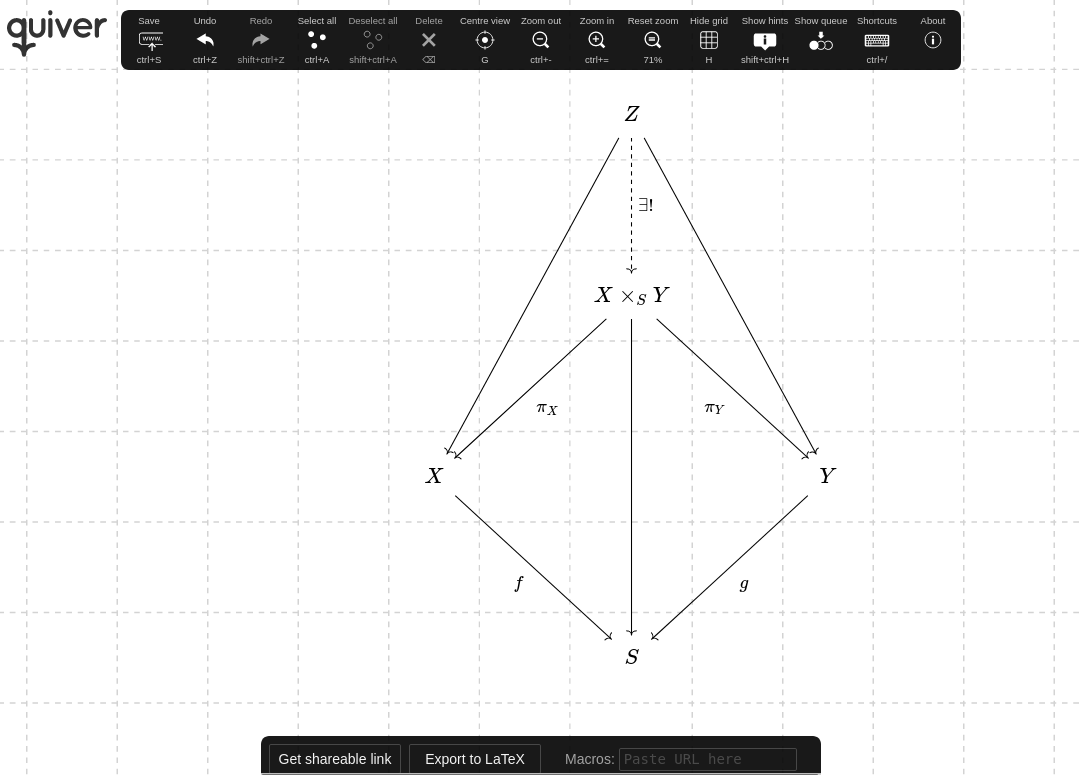
The easiest way to include commutative diagrams is by using quiver app available online at https://q.uiver.app/ For example, add the following to the preamble:
\usepackage{tikz-cd}
Then draw the following diagram using quiver app
And add the corresponding exported code in the tex file:
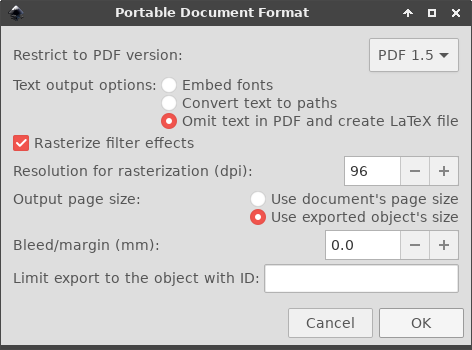
The easiest way to include diagrams as vector graphics is by using Inkscape as follows:
Draw the desired diagram in Inkscape, and enclose mathematical symbols in $...$. If you don’t know how to use Inkscape then just go to Help > Tutorials > Inkscape: Basic and you will be ready to use.
Create a folder called “pictures” inside the folder containg the main tex file and save the diagram as svg so that you can edit it in the future if needed. Then also save PDF+LaTeX output to the same “pictures” folder: File > Save As... > Select PDF from the drop-down menu > Click Save > Choose the following options
Add the following code to the preamble of your main tex file (source1 and source2):
\usepackage{import}% it will enable us to access images without keeping them in the document's directory\usepackage{calc}% enable usage of \svgscale\usepackage{graphicx}% for inserting images\usepackage{xcolor}% for adding colors\usepackage{transparent}% enables usage of separate color stack for transparency
Now we can add “image.svg” in one of the following ways (source1 and source2):
\begin{figure}[h]
\centering\resizebox{75mm}{!}{\import{./figures/}{image.pdf_tex}}\caption{Your figure}\label{figure:example}\end{figure}\begin{figure}[h]
\centering\def\svgwidth{0.75\columnwidth}%Using \def\svgwidth{desired width} instead of \resizebox will preserve the font size\import{./figures/}{image.pdf_tex}\caption{Your figure}\label{figure:example}\end{figure}\begin{figure}[h]
\centering\def\svgscale{0.75}\import{./figures/}{image.pdf_tex}\caption{Your figure}\label{figure:example}\end{figure}
You can also write scripts to make this process easier. The main advantage of Inkscape is that there’s hardly any command or action that is impossible to do from keyboard. Linux users may not get the expected results with the key combinations starting with Alt key if the Window Manager catches those key events before they reach the inkscape application. One solution would be to change the WM’s configuration accordingly.
]]>Gaurish Korpalgkorpal@math.arizona.eduhttps://www.math.arizona.edu/people/gkorpalUsing Terminal Emulator as LaTeX editor2020-08-31T00:00:00-07:002020-08-31T00:00:00-07:00https://gkorpal.github.io/posts/2020/08/latex-vim-mupdfIn this post I have written down the steps one can follow to use the Terminal Emulator as a versatile LaTeX editor. A good reference for learning LaTeX is “The not so Short Introduction to LaTeX.”
Preparation
The plan is to use Vim as the text-editor and MuPDF as the pdf-viewer since both can be accessed solely via keyboard, while keeping all the desired features from other LaTex editor like “live pdf preview” and “compile using latexmk” from GTK based Gummi and “forward and backward search to switch between the sources and the PDF” and “detailed compilation errors” from Qt based TexMaker.
We will need the following packages to begin with:
If you want GUI version of Vim then can get gVim by installing the package vim-X11. For gVim you will have to modify these steps accordingly.
Vim configuration
Once you finish learning basics using vimtutor, you are ready to start configuring Vim as per your requirements.
.vimrc file creation
To start Vim with all the favorite option settings and mappings, one writes them in what is called the vimrc file. The vimrc file can contain all the commands that you type after a colon. Vim executes the commands in this file when it starts up. Read the documentation for more details. Note that Vim 8.0 onwards, if Vim is started normally and no user vimrc file is found, the defaults.vim script is loaded. This will set ‘compatible’ off, switch on syntax highlighting and a few more things. See this reddit post for a discussion about this. To disable loading of defaults.vim completely add let skip_defaults_vim=1 to /etc/vimrc (see this).
Since vimrc is something personal that evolves over times as per one’s usage requirements, it’s not recommended to blindly copy it from the internet. I used this example as reference for creating the following ~/.vimrc
setnocompatible " get rid of Vi compatibility mode.filetype plugin indenton " filetype detection[ON] plugin[ON] auto-indent[ON] depending onfiletypesett_Co=256 " enable 256-color mode.syntax enable " enable syntax highlighting (can also use syntaxon).colorscheme morning " I am using it with solarized (dark) color pallet in xfce4-terminal.sethidden " allows you tore-use the same window without saving it firstand keep an undohistoryforall the files using the same window.setnumber " show line numbers to the leftsetruler " Always show cursor position.setlaststatus=2 " always display the status lineso that you can see the current mode,file name,file status,ruler, etc.filetypeindenton " activates indenting forfilessethlsearch " highlight searched phrases.setignorecase " Make searches case-insensitive.setsmartcase " Make search case-sesitive when using capital letters
setautoindent" When opening a new line and no filetype-specific indenting is enabled, keep " the same indentas the line you're currently on.setbackspace=indent,eol,start " Allow backspacing over autoindent,line breaks and start of insert action
settabstop=8 " sets tab stops to8 characters wide
setsofttabstop=4 " makes the Tab key intent by 4 spaces
setshiftwidth=4 " width of autointents setto4 spaces
setexpandtab " converts tabsto white space
setmouse=a " Enable use of the mouseforall modes
setwraplinebreaknolist " Soft wrapping text. To move the cursorupand down within wrapped line use the commands gk and gj.
You can use this guide to create a backup of your vimrc file using GitHub so that you can easily configure Vim on any other computer (how to find git folder). You can follow the official guide to set-up GitHub for this purpose.
vimtex plugin installation and configuration
You can install vimtex manually or using a plugin manager (see this guide). We will use the vim-plug plugin manager to install vimtex. Firstly, we will download plug.vim and put it in the ~/.vim/autoload directory using following code:
Next we will enable vimtex by adding the following section to the ~/.vimrc file:
call plug#begin('~/.vim/plugged') " Specify the directory~/.vim/plugged for plugins. Avoid using standard Vim directory names like ~/.vim/plugin
Plug 'lervag/vimtex' " Shorthand notation for fetching the vimtex plugin from https://github.com/lervag/vimtex
call plug#end() " To update &runtimepathand initialize plugin system
Once the vimrc is properly configured, restart Vim or reload the vimrc file (make sure that git is installed for this to work). Finally, run the :PlugInstall command to start the installation of vimtex plugin. Vim-plug will download all the packages directly from GitHub and put them into the ~/.vim/plugged directory and load them whenever Vim is loaded. To update plugins use :PlugUpdate command and to remove them use :PlugClean command. Also, to update vim-plug itself, use :PlugUpgrade command.
Now we will set it up following the official documentation of vimtex, and adding the following to ~/.vimrc:
letg:tex_flavor='latex' " Vim ships with some support for plain TeX, ConTeXt,and LaTeX files. This means that the `.tex` extension is ambiguous. Vimtex isonly activated for LaTeX files with 'filetype'setto `tex`.letg:vimtex_view_method='mupdf' " Set the pdf viewer. MuPDF supports forward and backward search via xdotool. For backward search use :VimtexRSearch command. Forward search will only take you to the correct page. Backward search will take you to the linein Vim that corresponds to the firstline of the current page in MuPDF.letg:vimtex_compiler_latexmk={'options':['-pdf','-shell-escape','-verbose','-file-line-error','-synctex=1','-interaction=nonstopmode',],} " we need to enable -shell-escapeto be able to use externalization library for avioiding recompiling unchanged diagrams/graphs created using tikz/pgfplots
Note that by default the following desired options are already there:
latexmk is the compiler which does compilation as soon as you save the file (continous compilation, better than live preview)
auto-completion is enabled,
BibTex is used for bib files,
fold types are enabled,
intentation in both tex and bib are enabled,
vimtex will open the pdf viewer automatically after compilation
forward search is enabled, i.e. it will perform a forward search to the current cursor position when the first invocation of the pdf viewer happens. It uses SyncTex and requires xdotool to work with MuPDF (also prevents opening multiple instances of pdf).
You can further customize by adding snippets as demonstrated in various blog posts (ex1, ex2, ex3 and ex4).
Usage instructions
Following are the useful key mappings for the various vimtex commands:
Key mapping
Vimtex command (normal mode)
Output
\\ll
:VimtexCompile
Run latexmk compiler in continuous mode which complies the saved tex file and shows the pdf (can disable automatic pdf view in case of multiple pdf bug). This command works as a compiler toggle.
\\lv
:VimtexView
View pdf for current project and perform forward search if available.
\\lr
:VimtexRSearch
Do reverse search (only available for MuPDF viewer with xdotool installed).
\\le
:VimtexErrors
Open quickfix window if there are errors or warnings. Press :ccl to close it.
\\lk
:VimtexStop
Stop compilation for the current project.
\\li
:VimtexInfo
Show information that is stored by vimtex about the current LaTeX project. Press q to exit
\\lt
:VimtexTocOpen
Open table of contents. Press q to exit
\\lg
:VimtexStatus
Show compilation status for current project.
\\ls
:VimtexToggleMain
If you are working with multiple tex files may want to change the main file for the project
We have many other shorthand keymaps like:
Key mapping
Vim mode
Output
]]
insert
Closes the current environment or delimiter, i.e adds \end{foo} for the corresponding \begin{foo}
]]
normal
Go to next end of a section.
][
normal
Go to next beginning of a section.
[]
normal
Go to previous end of a section.
[[
normal
Go to previous beginning of a section.
]m
normal
Go to next start of an environment \begin.
]M
normal
Go to next end of an environment \end.
[m
normal
Go to previous start of an environment \begin.
[M
normal
Go to previous end of an environment \end.
dse
normal
Delete the surrounding environment, i.e delete both \begin{foo} and \end{foo}.
dsc
normal
Delete surrounding command like \begin{} deleted from \begin{foo}
cse
normal
Change the surrounding environment, i.e change both \begin{foo} and \end{foo} to \begin{too} and \end{too}
csc
normal
Change surrounding command like \begin{foo} changed to \end{foo}
Note that vimtex supports most multi-file documents. The main method uses a recursive search algorithm that should find the main LaTeX file in most cases. Read the documentation for more details.
]]>Gaurish Korpalgkorpal@math.arizona.eduhttps://www.math.arizona.edu/people/gkorpalUpgrading to the next level of Linux experience2020-08-08T00:00:00-07:002020-08-08T00:00:00-07:00https://gkorpal.github.io/posts/2020/08/fedoraMy quest to find the best Linux distro for the new PC.
Update (Aug 30, 2023): I have moved to Windows 11 with WSL. We have Microsoft Windows supporters like SUSE (openSUSE), Ubuntu (Debian Sid), and RedHat/Oracle Linux (Fedora) for WSL, Azure,… and competitors like Apple macOS (UNIX) and Google chromeOS (ChromiumOS).
Open-source software is better
Open-source softwares are great because they have scope for technical superiority by allowing transparency. In fact, this is good enough incentive for many big corporations like Intel (server processors), IBM (Red Hat Enterprise Linux), Microsoft (Azure), Google (Chrome), Novell (SUSE Linux), etc. and smaller companies like Canonical (Ubuntu), etc. to sponsor Linux Foundation and other commmunity-driven Linux projects like GNOME (with major contributions coming from Red Hat), KDE (with major contributions coming from SUSE), and Debian (with major contributions coming from Canonical). However, there are still some popular Linux related projects like Arch Linux, Gentoo, Cinnamon DE and Xfce that are being developed by the community at a steady pace without any corporate funding. Though these community-only projects are really powerful and allow the user to create a custom workflow, they tend to attract only the ones with considerable knowledge of Linux and a desire to contribute.
For normal consumer products like desktops and laptops, Microsoft Windows has the monopoly because it comes pre-installed for free and is supported by all softwares (games) and the latest hardware. However, in the enterprise world where mainframe computers and servers need to be really secure, Linux distributions like Ubuntu, RHEL, CentOS, SUSE, and Debian tend to be more popular. Among these, Debian is the only one which is not owned by any specific company, but companies can directly fund the long-term-support. Ubuntu, which derives its source from Debian Sid, is quite popular among tech start-ups because of its freemium kind of business model where anyone can download it for free and one only needs to pay for extended service (similar to the extreme popularity of the free-to-play games like Fortnite and PUBG). In fact, it was marketed so well that it is the most popular Linux distribution among people who just wants a better OS than Windows but can’t afford to be a part of the Mac ecosystem.
My understanding of current Ubuntu development.
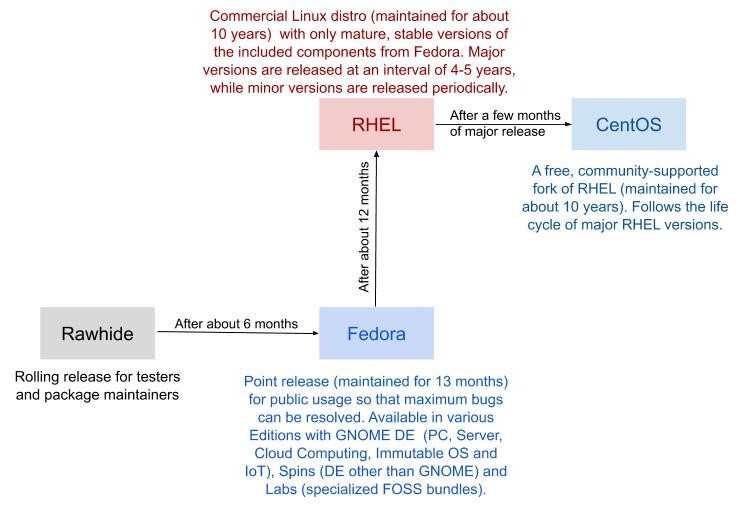
Ubuntu’s major contribution has been the LightDM display manager. However, neither Ubuntu nor Debian is the market leader because they lack fast-paced innovation. RHEL has been the market leader for enterprise linux for a long time, mainly because it has invested a lot in innovation. Following is a rough representation of how it works in present:
My understanding of current RHEL development.
Update: CentOS development was stopped on Dec 08, 2020 after being bought by IBM. However, the development of Rocky Linux has started.
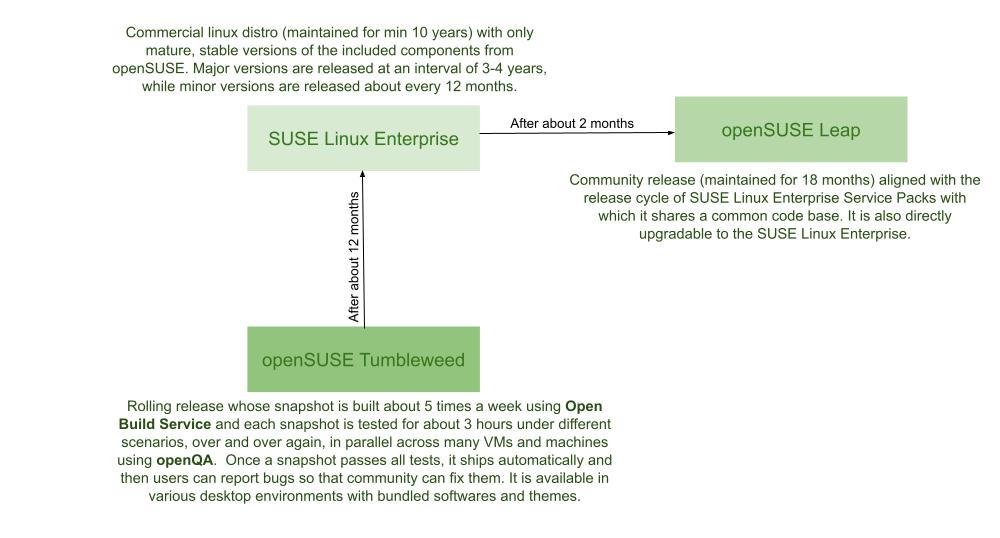
The second most popular enterprise Linux distro is SUSE, it is the oldest commercial Linux distro. In recent years, it has also reorganized itself by starting community driven openSUSE project similar to the successful Fedora project to speed up innovation:
I especially like the open-source softwares like these, which let individual users access them for free while charging big corporations for techincal support. Some other examples are, Anaconda by Travis Oliphant (it also helps fund development of NumPy etc. via NumFOCUS) and MySQL by Oracle Corp.
Mix and Match
Now a days there are many emerging comeptitors like Manjaro and Solus competing with Ubuntu and its forks for the non-technical users. I was introduced to linux as a non-techincal user in 2006 when I ran Ubuntu in a virtual box on my Windows XP desktop PC, thanks to the free CD I got with the PC World magazine I had bought during summer vacations. I have been using Ubuntu-based distros (I replaced Windows 7 with Lubuntu on my Netbook) since Windows XP died in 2014, and it has been a nice journey. Whenever I ran into some trouble, I just copy-pasted codes from some blog/forum and ignored issues as long as work got done. For example, I chose not to use WiFi over using Windows 8 when Realtek drivers were breaking on Ubuntu (had no idea it has to do something with Linux Kernel). But now since I have built my own PC for the first time, I have a much better knowledge of the hardware and find it difficult to just shrug shoulders as long as system boots. Theorefore, Ubuntu can no more fulfill my needs and I will have to move to a little less stable distro.
The main use of my new PC is to write documents in LaTeX, hence I would really like to have easy access to the latest version of texlive and text-editor (like Vim, though you will always get some version of vim-minimal pre-installed). However, stable distros like Ubuntu LTS and openSUSE Leap tend to have outdated repositories of both of these and Ubuntu tries to mitigate this with untrusted PPAs, unstable Snaps and useless Flatpaks. Moreover, compiling them from sources can be a bit tricky (eg: installing TexLive and Vim). Hence I felt the need to migrate to a distro which can give easy access to latest version of these programs. But I don’t have enough time and knowledge to be able to maintain the stability and security of rolling-release distros like Arch, openSUSE TW and Gentoo. Therefore, since I don’t need any proprietary drivers for my PC, I decided to take a middle ground and move to the pseudo-rolling/stable-release distroFedora (13 month life cycle, new release every 6 months) which is the upstream source of the commercial Red Hat Enterprise Linux distribution. Another reason for choosing Fedora was that its community is more knowledgebable (RedHat is one of the biggest contributer to Linux kernel) and the bugs acutally get resolved (for Ubuntu there can exist an year old bugs like the initramfs bug with temporary solution in forums). One bug that has followed me in Ubuntu and Linux Mint is the momentary blackout of screen when some pop-up menu opens in applications like Google Chrome and TexMaker Settings, however I have no hope of it getting solved since there is this similar three years old bug report in the forums.
For the desktop environment I decided to go with Xfce because most of my applications use GTK (hence not KDE or LXQt), didn’t want to waste RAM for customizability (hence not GNOME 3 or MATE which are resource heavy but still lack simple in-built customization options like desktop wallpaper slideshow, requires separate pacakges like GNOME Tweaks and GNOME Extensions) and needed stability (hence not Cinnamon which lacks proper documentation and bug resolving mechanism, eg: this an year old zombie-windows bug which requires restarting cinnamon to troubleshoot, moreover most appearance tweaks depend on themes and applets created by volunteers which are not guaranteed to be actively maintained). Cinnamon is an attempt to mimic Xfce while staying close to GNOME, however its lack of documentation ability to tweak easily is a big negative. One thing I miss in Xfce is the absence of dock (using Plank is fissible but not ideal). However, it can easily be mitigated by setting up keyboard shortcuts for the frequently used applications.
I installed Fedora Xfce using Server Netinstall instead of the official Spins since they tend to be bloated and will have to install lots of updates afterwards. Fedora comes with Ubuntu’s LightDM display manager which manages the login screen, in the case of Xfce Fedora uses the Xubuntu’s LightDM GTK+ Greeter.
Update (June 22, 2021): My university changed their wired internet connection protocol and now it requires unsername and password. Hence can’t use this Netinstall method anymore. Back to using the livecd image.
Differences between Ubuntu and Fedora
Most of my Linux experience is based on Ubuntu. Following are some differences that I experienced:
Administrator vs. User
Users have the option of setting a root password in when installing a non-GNOME Fedora, but it is not required if the user creates an initial user account and selects the option to add it to the wheel group. If root password is set, then the root account is the account for the system admin. This account is disabled in Ubuntu. In Ubuntu, one performs actions that require root privileges using sudo, while in a Fedora spin, sudo is not the default method of gaining administrative permissions. Therefore, in Fedora Xfce spin with root password, root access can only be gained with su. su will ask for the root password, not the regular user password. After logging in successfully as root, one has administrative rights until terminal is closed or logged out with exit. However, for GNOME Fedora, it’s just like Ubuntu i,e. no root password set by default and user account is handled by gnome-initial-setup. Having a root password is not useful for nontechnical users.
Package management
Fedora uses different tools for package management to Debian. Here is a quick overview of how to accomplish common tasks in Fedora: (source)
Debian command
Fedora command
apt update
dnf check-update
apt upgrade
dnf upgrade
apt dist-upgrade
dnf system-upgrade
apt install
dnf install
apt remove
dnf remove
apt purge
N/A
apt-cache search
dnf search
In older versions, apt-get in Ubuntu corresponded to yum in Fedora. To know if a reboot is needed after doing a dnf update use either tracer or needs-restarting plugin. Unlike Debian/ubuntu, I don’t need to remeber to use autoremove after removing some package.
Moreover, like in Ubuntu we use dpkg for installing .deb files, we can use rpm in Fedora for installing .rpm files. Following is a comparison of commands:
Command Details
Fedora Command
Ubuntu Command
Install a package
rpm -i package.rpm
dpkg -i package.deb
Update package
rpm -U package_name
dpkg -i {file.deb}
Remove an installed package
rpm -e package_name
dpkg -r package_name
List all installed packages
rpm -qa
dpkg -l
List files in an installed package
rpm -ql package_name
dpkg –listfiles package_name
Show information about installed package
rpm -qi package_name
dpkg –status package_name
Show information about package file
rpm -qpi package.rpm
dpkg –info package.deb
List files in a package file
rpm -qpl package.rpm
dpkg –contents package.deb
Verify all installed packages
rpm -Va
N/A
Verify installed package
rpm -V package_name
N/A
You can also use dnf instead of rpm, just like we can use apt instead of dpkg. You can find an outdate but more extensive list in Ubuntu Wiki.
Finding packages using GUI
Fedora’s equivalent to Debian’s Synaptic package manager is dnfdragora which uses the widget abstraction library written by SUSE. Unfortuately it’s nowhere as good as Synaptic. Moreover it is extremely RAM hungry. However, in GNOME edition of Fedora there is GNOME Software Centre which makes things smoother, but requires PC reboot for installing updates. In the RPM world opeSUSE has YaST as a worthy competitor of Synaptic (but that feels too nosey, it is much more than just a package manager).
Installing packages not in repository
The equivalent of the Ubuntu restricted and multiverse repositories, that include patented and closed-source technologies and programs, is the RPMFusion repository. free is the equivalent of universe and contains potentially patent-encumbered software like gstreamer-plugins-bad or the VLC media player, while nonfree includes non-free software like proprietary 3D graphics drivers.
These repositories can easily be enabled by typing (as root):
Moreover, the equivalent of the PPAs in Ubuntu is Copr. This repository can be added with
dnf copr enable user/project.
Note that just like Ubuntu PPA and Arch AUR, there is no way to verify that a package in Copr does not contain anything malicious unless you review the source code.
Linux Security Modules
Ubuntu uses AppArmor (which was earlier developed by SUSE), whereas Fedora uses SELinux. AppAromor is said to be easier to maintain than SELinux.
Note that modern Linux OS don’t require separate partitions for both /boot and /boot/efi (EFI System Partition) directories. The only requirement for suing GRUB2 boot loader is that /boot directory must be on a plain ext4 or xfs partition and /boot/efi directory must be on a plain vfat partition. If one wants to install Fedora with only two paritions / and /boot then it is recommended to use systemd-boot boot loader instead. However, since we were following Fedora’s recommended partitoning scheme we created separate /boot and /home paritions with standard ext4 format instead of leaving them with /. Also, I alloted thrice the recommended size for 20 GB for / because I plan to use Timeshift which saves snapshots in root directory itself and works only with GRUB2 (very important tool, was fixed later).
Select Xfce Fedora without any extra software programs, we will manually install the ones we want. To bypass creating root password in netinstall mode, just create a user account and mark it as administrator. After installing, the first think we will do is set-up drop-down terminal following this guide. Also consider changing first day of week to Monday by following this guide.
Free and open source softwares
Vim, PulseAudio Volume Control and dnfdragora are already installed.
Unfortunately, Signal doesn’t have an official Fedora repo, however it can be installed using Copr.
To find more softwares, use: dnfdragora > Groups > Xfce desktop option.
Finally, if you need Windows to access applications like OneNote instead of Xournal++ then you can install it by running Win 10 virtual machine, by using virtIO drivers along with virtualization, that is choose i440FX chipset, UEFI without secure boot, QXL video and virtio for Virtual Disk and Virtual Network Interface (make sure to update all the missing Windows drivers using the virtIO iso file). Alternatively, dual-boot Fedora with Windows following this guide and remember to disable HDCP support overrride in Display settings of AMD Radeon driver if not using HDMI port.
Note that Google Chrome poorly integrates with the Linux. For example, if you change the default DPI of 96 or font scaling for the display then Google Chrome text and images get blurred and you have to fix it yourself (possible solution 1 and solution 2).
It also poorly integrates with Xfce since it attempts to creat its own default keyring for password encryption, so either you will have to create another password or disable it.
DNF plugins
We will install the following two plugins:
Purpose
Plugin
dnf package
To check which services need to be restarted after update
Note that the default appearance editor can only edit GTK2 themes/icons. Therefore, to edit GTK3 themes/icons either edit the ~/.config/gtk-3.0/settings.ini or use the LXDE appearance editor lxappearance. You might also have to make changes in Settings Manager > Windows Manager Tweaks > Accessibility.
Finally, to change background use “Settings Manager > Desktop > Background” and select the folder /usr/share/backgrounds/f32/extras/.
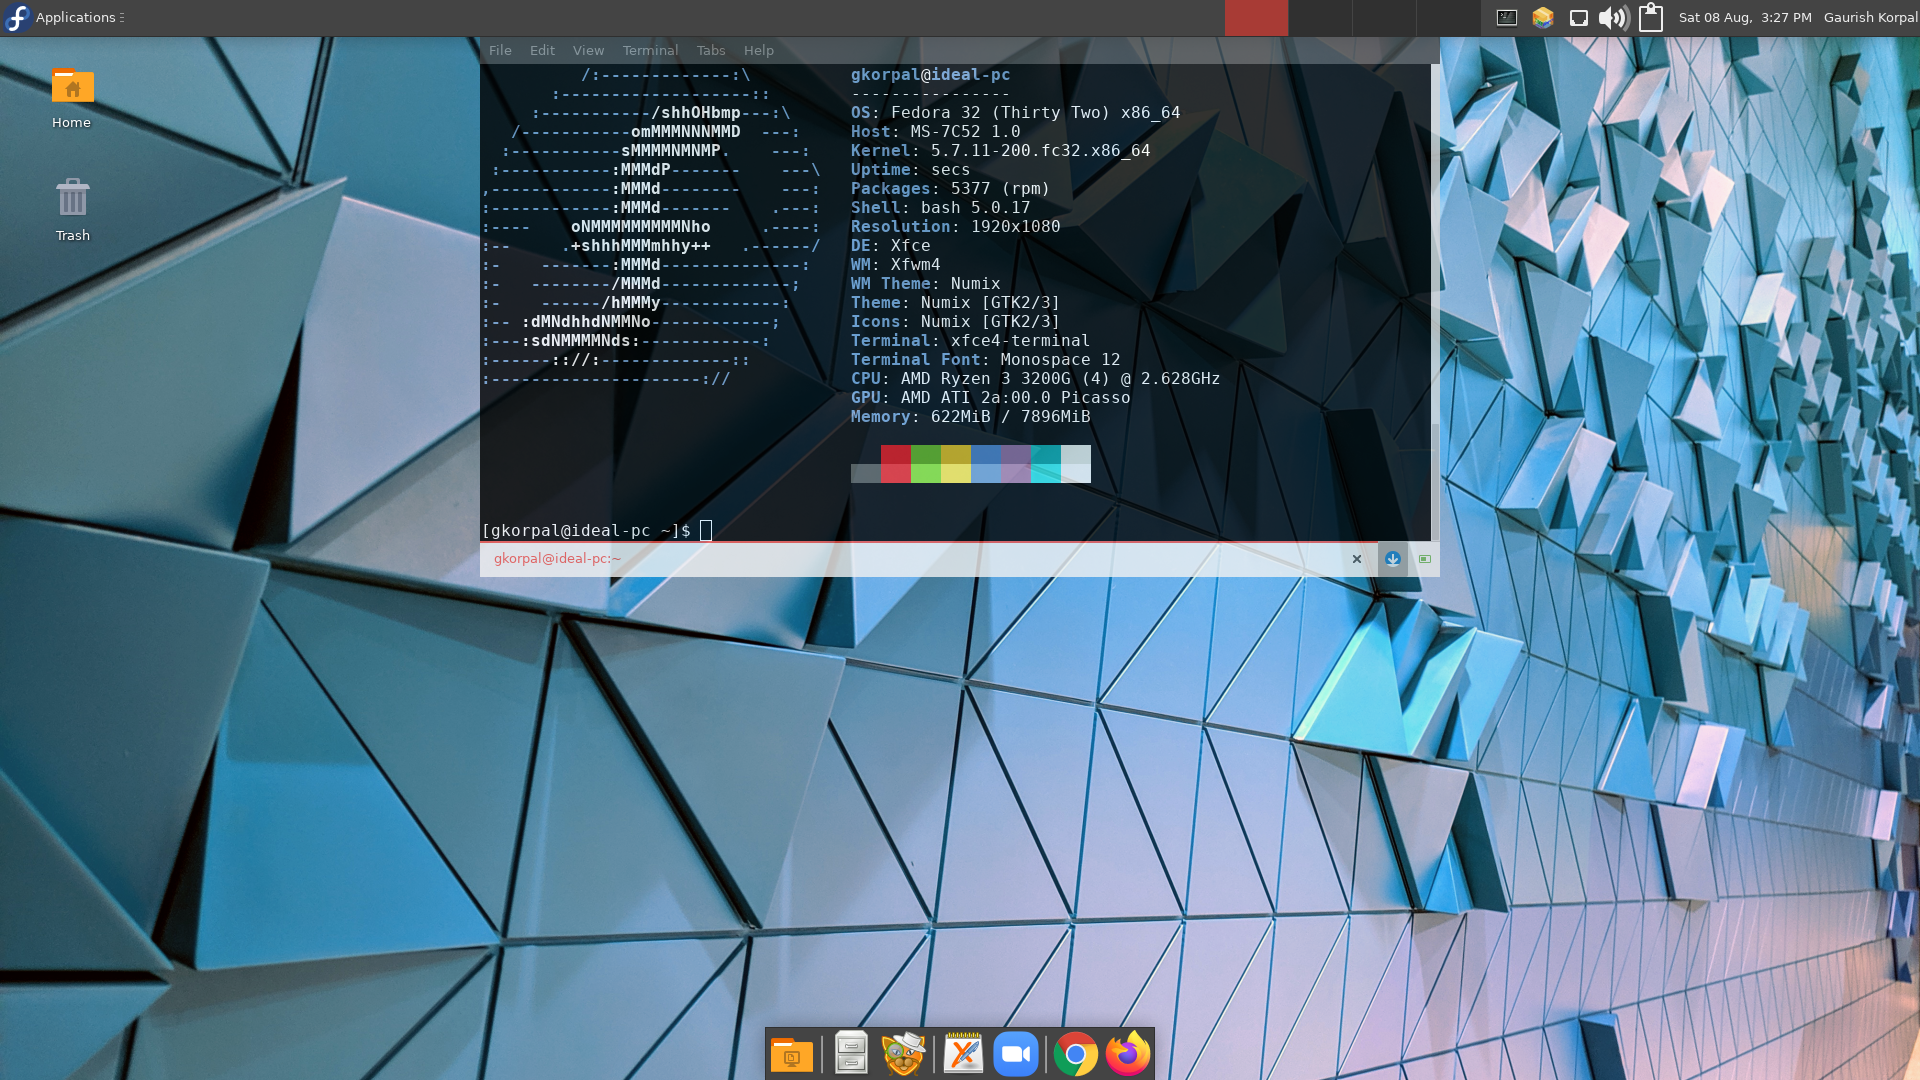
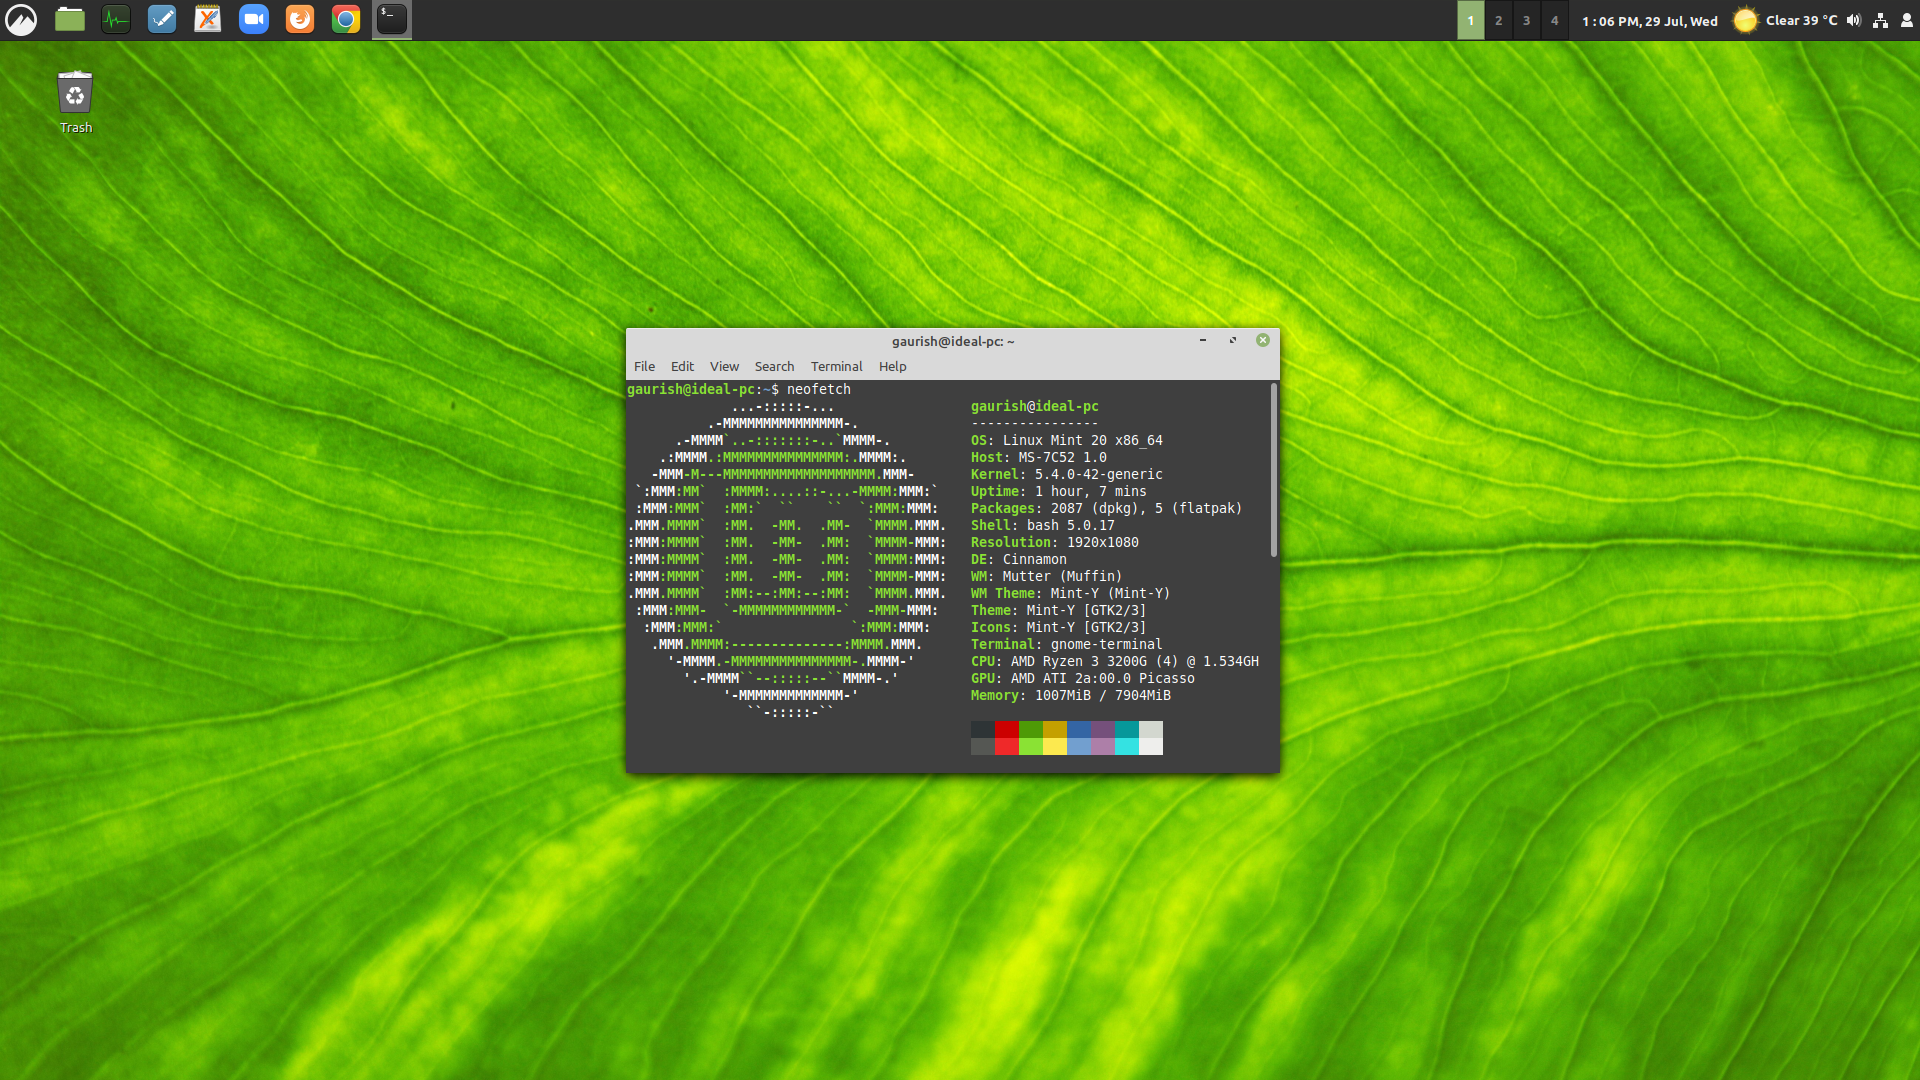
Desktop screenshot showing neofetch output. (open image in new tab if it is too small)
Introspection
The plan is to upgrade to next version of Fedora three months after its release so that maximum bugs can be avoided (eg: initial release of Fedora 32 had a bug which has been corrected later using system updates). Hence I will get a system wide update twice a year. Fedora is going to change to btrfs as default filesystem in the next release of Fedora 33 (something default in SUSE but abandoned by Red Hat). One annoying thing is that I have to install lots of updates everyday since Fedora pushes bug fixes as soon as they are found, irrespective of how important they are. Moreover, the supported releases are updated to the latest stable version of the Linux kernel, increasing the chances of unstability.
Though Xfce is highly customizable and has a great documentation, it lacks GUI for basic things like system info viewer, individual CPU core usage, user login picture manager (though Fedora has Whisker menu plugin, it lacks the required Mugshot package) and tablet pen-pressure settings (which can also be done in GNOME 3, Cinnamon and KDE). However, these can easily be done using manually via Terminal:
For system info we have CLI tools like inxi (doc), neofetch and lshw.
To view system usage information we can use tool like top in terminal, and get individual core usage by top 1 (doc).
Add the line: Icon=/var/lib/AccountsService/icons/<your_user_name>/<my_picture_of_size_96x96>.png.
For Wacom tablet pen-pressure on X Window System we can use xsetwacom (doc)
xsetwacom set "Wacom One by Wacom S Pen stylus" PressureCurve 0 50 50 100
However, any setting changed by xsetwacom will be reset to default (or a statically configured setting) whenever the device is unplugged, disabled or the X Server is restarted. One can make Linux run the command automatically when hot-plugging the device by entering the above command to Settings Manager > Removable Drives and Media > Input Devices > Automatically run this command when a tablet is connected. Note that, these CLI methods won’t work when using Wayland instead of Xorg. I could’t make CLI work in Cinnamon, only GUI settings worked and provided the following options:
GNOME key-ring: Issue originating from GNOME which have crept into LightDM.
Epilogue
After one year of using Fedora 32 and 33 with Xfce 4.14, in June 2021, I moved to OpenSUSE Leap 15.3 with KDE 5.18 instead of Fedora 34 with Xfce/GNOME. It was mainly because of the issues with Xfce 4.16 (unable to control power settings for idle time) and Linux kernel 5.12 (messing with swap partition, hanging since not freeing the RAM). I was also annoyed by the large number of updates I received everyday on Fedora (but stuck with TexLive 2017, which was always up-to-date in Fedora). However, I do miss the package information system and documentation of Fedora. Other than that, OpenSUSE and KDE have worked great out of the box (DON’T ENCRYPT THE HARD DRIVE, disable secureboot and disable NVRAM). I had to install OpenSUSE in virtual machine first, in order to make the installation USB using SUSE Studio Image Writer (moreover, change in college internet connection policy made it impossible to use netinstall). Another option would be to use Ventoy.
After installing, I used windows to reformat the USB stick to exFAT format. Then to access USB stick in openSUSE, install fuse-exfat package.
If Konsole starts in super user mode, then go to Settings > Manage Profiles > Edit profile > General it is important that in ‘Command’ it does not say su- but /bin/bash.
Adjust screen off time: System Settings > Power management > energy saving
Disable the auto-updater PackageKit since it can interfere with the manual software installation: Configure System Tray > Software Updates > Disabled.
Replace Firefox’s Extended Support Release (ESR) with the latest version from the Mozilla repository using YaST or terminal:
> sudo zypper ar -f http://download.opensuse.org/repositories/mozilla/openSUSE_Leap_15.3/ mozilla
> sudo zypper ref
> zypper up --from mozilla
Unfortunately, the fonts don’t render properly sometimes due to KDE integration limitations. Also install Plasma integration add-on. Then, to watch Netflix, also install the KDE multimedia codecs from Packman using 1-click. Somehow, vlc-lang package didn’t swtich the repository so had to do it manually.
> sudo zypper up --allow-vendor-change
Loading repository data...
Reading installed packages...

The following package is going to be upgraded:
  vlc-lang

The following package is going to change vendor:
  vlc-lang  openSUSE -> http://packman.links2linux.de
Also, had to build SageMath from the source, took 4 hours (for reference: 6000+ packages of texlive-scheme-full take 1 hour to download and install)
>sudo zypper install gcc gcc-c++ make m4 binutils perl tar python3 dvipng ffmpeg texlive-scheme-full
> ./configure
# we will skip installing the suggested packages, openSUSE Leap has a limted collection of packages.# will rather build everything from source, hence the long build time.> make
-----[2021-07-14 22:12:09] SageMath version 9.3, Release Date: 2021-05-09
Yes, Sage starts.
real 225m36.799s
user 229m31.133s
sys 13m38.360s
Sage build/upgrade complete!-----> ./sage --testall>sudo ln-s /path/to/sage-x.y/sage /usr/local/bin/sage
There is color-scheme bug. Ceate a file called 50-color.ipy in .sage/ipython-X.Y.Z/profile_default/startup with the following content:
%colors Linux
Also, KDE icon can be created using the folliwing command for launching in Applications tab:
konsole -T "sage" -e /path/to/sage-x.y/sage
]]>Gaurish Korpalgkorpal@math.arizona.eduhttps://www.math.arizona.edu/people/gkorpalCOVID Crisis Tech Remedies (May 2020)2020-08-03T00:00:00-07:002020-08-03T00:00:00-07:00https://gkorpal.github.io/posts/2020/08/amd-pcMy quest for building a cheap PC capable of running Linux, especially LaTeX.
With the “work-from-home” restriction imposed to counter COVID crisis, the chromebook became even more useless. It could neither run the desktop version of Zoom nor work with a drawing tablet. I believe these problems can be solved by enabling the Developer Mode and installing Ubuntu alongside ChromeOS, but I highly doubt that audio and other drivers will work in Ubuntu. However, since mobility is not desired anymore, I decided to build desktop PC with minimum possible budget (which turned out to be USD 650, same as the cost of the basic Pixelbook Go or an entry level ThinkPad with core i5 10th gen). Moreover, desktop CPUs are much more powerful than laptop CPUs, for instance the Intel Core i3-9100 gives slightly better performance than Intel Core i5-10210U.
Performance
Following is the comparison of my PC with the best laptop available in the market in May 2020 for USD 650 (before tax):
PS/2, 5 x USB 3.2, 4 x USB 2.0, DVI-D, HDMI, Audio In/Out, 2 x Mic
1 x USB Type-C, 1 x USB 3.2, 1 x USB 2.0, HDMI, Headset/speaker jack
Network
Realtek 8111H Gigabit LAN
Intel Integrated WiFi 6 (802.11ax) and Bluetooth 5.0
Audio
Realtek ALC892 Codec
Realtek Audio
Display
21.5” 1920x1080 60Hz IPS with Eye Care and 2 stereo speakers
14” 1920x1080 IPS with Bluelight Shiel and 2 stereo speakers
Webcam
720p with mic
720p with mic
Keyboard
Tenkeyless mechanical with Outemu Blue switches
60% chiclet with scissor switch and backlight
Pointing device
Wireless mouse
Touchpad
Warranty
1.5 to 5 years depending on the part
1 year
Bottomline
Sturdy and easy to repair
Mobility (0.71” thin and 2.65 lbs)
This will certainly an upgrade from the desktop computer I used a decade ago with Intel Pentium 4 CPU and 512MB RAM (no idea what graphics card was there in that machine). Moreover, though on paper Intel Core i7 4702MQ (my old Thinkpad) is not much worse than AMD Ryzen 3 3200G in terms of CPU performance, the AMD iGPU much better. For instance, with the best graphic settings of SuperTuxKart (for 60FPS/1080p required to have min AMD Radeon RX 460 with 1 GB VRAM), AMD gives about 30 fps on an average whereas Intel only gives 10 fps.
Desktop screenshot showing neofetch output. (open image in new tab if it is too small)
Cloud Backup Setup for Linux PC (tested in Linux Mint and Ubuntu)
I am using rclone to sync files between my PC and Google Drive. Following are the steps one can follow to set it up:
Create your own Google Drive OAuth2 client ID for rclone:
a) Log into the Google API Console with your Google account. It doesn’t matter what Google account you use. (It need not be the same account as the Google Drive you want to access.
b) Select a project or create a new project.
c) Under “ENABLE APIS AND SERVICES” search for “Drive”, and enable the “Google Drive API”.
d) Click “Oauth Consent Screen” in the left panel and select user type “External”. Then add Application name (anything you want) and save.
e) Click “Credentials” in the left panel. Then click on “+ CREATE CREDENTIALS” button at the top of the screen, then select “OAuth client ID”. Select Application type as “Desktop app”, enter whaever client anme you want and click create.
f) It will show you a client ID and client secret. Use these values in rclone config.
Install the latest version of rclone via Terminal: curl https://rclone.org/install.sh | sudo bash
Now configure rclone for Google Drive via Terminal: rclone config and follow the steps. Remeber to use the Client ID and client secret we created above. Since we created this API for personal use, we won’t be submitting it for verfication. Hence don’t be alarmed by the very scary confirmation screen shown when we connect via your browser for rclone to be able to get its token-id. Also, if you want to fetch Google Docs as links (instead of converting them to .odt etc) from Google Drive, in “advance-config” set “export-formats” to “link.html”.
Sync files using “copy” and NOT “sync”: rclone copy source:path dest:path [flags]. For example, to sync all files from “New Folder” Google Drive (named: Drive) to PC (folder: home) and view the progress, type: rclone copy Drive:"New Folder" /home -P. Google Drive tend to have duplicate files since it allows same names files in same folder, in that case use dedupe to delete all duplicate files.
Set-up auto update for rclone program (can see the latest version here):
a) Open the bash file using a text editor like gedit/xed/vim: ~/.bashrc
b) Add the following code to the file and save it: rclone() { if [[ $@ == "-U" ]]; then command curl https://rclone.org/install.sh | sudo bash; else command rclone "$@"; fi; }
c) To update to the latest version run this in the Terminal: rclone -U and enter the PC password.
In case you wish to remove rclone, run the following commands in terminal which will delete the files containing information about rclone:
All the system part recommendations were from PC-Part-Picker forums and Build-a-PC subreddit hence were biased towards gaming performance.
PC Part
Model
MSRP (round figure)
Comments
System Unit
Total cost
USD 370
Should not require any upgrade for 4 years. 57% of the total budget.
CPU+GPU+Cooler
AMD Ryzen 3 3200g
USD 100
Latest and cheapest quad-core processor in the market with a proper GPU. However, the cooler is a bit loud when running at full speed.
Motherboard
MSI A320M-A Pro Max
USD 55
Cheaptest motherboard with Ryzen 3000 APU support and M.2 PCIe. Shortcomings include the lack of ability to overclock CPU, no VGA port, only 2 RAM slots, only one case fan port and Realtek LAN. Luckily it came with most stable UEFI/BIOS (UEFI version 7C52v24/E7C52AMA.240, Released Nov-07-2019)
Memory
Patroit Viper 4 Blackout (2x4GB, 3000MHz)
USD 40
Was able to use it at CPU’s supported frequency of 2933 MHz
Storage
Crucial P1 500GB
USD 60
This QCL NVMe M.2 SSD is chaper than many SATA SSDs in the market
PSU
Corsair CX450
USD 65
Cheapest 80+ Bronze rated power supply with good reviews.
PC Case
Cooler Master N200
USD 50
Decent quality mini-tower with two pre-installed quiet-fans (not PMW). However, it being small in size, made cable management really hard though it comes with zip-ties. I hade to move the front intake fan to the outside to get rid of humming noise (video)
Input/Output Devices
Total cost
USD 180
minimalistic, nothing fancy. 28% of the total budget.
Keyboard
Redragon K552-N
USD 30
Cheapest tenkeyless mechanical keyboard without any lighting. The next decent option was for around USD 100.
Mouse
Logitech M310
USD 20
Wireless ambidextrous mouse which is not very small. Though would prefer a bigger mouse.
Monitor+speakers
Asus VA229HR
USD 100
This 1080p 21.5” IPS screen with 1.5W sterio speakers didn’t meet my expectations. Its HDMI port doesn’t work well with my motherboard/GPU. Also, stand was so bad that I has to buy a new stand. Would have bought HP VH240a if it had longer warranty period and a smaller screen size option.
Webcam+mic
Logitech C270
USD 30
Better than the HD camera laptop has.
Accesories
Total Cost
USD 100
Required to make PC setup comfortable. 15% of the total budget.
Surge protector
Belkin BE108200-06
USD 20
Expected lifespan of 3 to 5 years.
Mouse pad
Insignia NS-PNP5008
USD 10
Should have bought the one with wrist rest
Monitor stand
Huanuo HNCM5-S
USD 25
Can tilt,rotate and adjust height of the monitor.
DVI-D to VGA cable
Benfei B07JYXYSSL
USD 15
Since HDMI didn’t work
Audio cable
StarTech Slim 3.5mm jack
USD 5
Since HDMI didn’t work
Ethernet cable
Quantum CAT5e
USD 15
bye bye wifi
USB 3.0 extension cable
Sabrent CB-3060
USD 10
Since the ports at the back of PC case are far away from the desk.
I also bought IKEA Micke (Black-Brown) computer desk for kids (had to remove the bigger drawer to accomodate my legs) and IKEA Flintan+Nominell office chair (USD 80 + USD 100).
Introspection
The original plan was to use Ubuntu 20.04 GNOME as the OS since I wanted a stable system (hence not the rolling release distros like Arch/Manjaro, Solus and openSUSE TW) with Linux kernel greater than 4.20 for AMD Ryzen Picasso APUs (hence not Debian and CentOS) and large software repository (hence not enterprise focused distros like OpenSUSE Leap and Fedora). But Ubuntu turned out to be RAM hungry, since it required extra softwares like GNOME extensions and Variety for customization, and depended on the unstable Snap store. While trying to fix these issues I was able to brick my system thrice and hence decided to shift to Linux Mint 20 Cinnamon which provides out-of-the-box support for Flatpak(needed for Xournal++) and blocks Snap while providing better customizability and the same 5 year support (unlike official Ubuntu flavours which give only 3 years support). Though the appearance and RAM usage became much better with Linux Mint, it still inherited many boot errors like:
Pulseaudio+BlueZ: due to unavailability of Bluetooth in my computer and presence of Pulseaudio and BlueZ 5.53 in Ubuntu 20.04.
initramfs: Boot speed improvements through changing the default kernel compression algorithm to lz4 (in Ubuntu 19.10) on most architectures, and changing the default initramfs compression algorithm to lz4 on all architectures. Somehow doesn’t work well for my PC. I switched to gzip compression to avoid this bug.
UVC driver/Alsa: I think that the audio driver of Webcam leading to error during boot.
Out of these 1 and 4 are logged consistently during each boot, 2 and 7 are logged some times, and the remaining could be fixed if they ever occur again. Since I am running LTS distro, I won’t have to worry much about losing compaibility of my hardware or learning about latest softwares. Though there are only non-fatal boot errors, since everything is working as intended, it might be best to just shrug sholders.
Also, if you are using NVMe SSD then consider installing the NVMe tool as discussed here (might lead to logging of boot errors). Once you install any linux OS I would recommend running following commands and checking is everything is running as expected:
inxi -Fxz #system information google to learn more about inxi

lscpu #can also see lspci, lshw

sudo nvme smart-log /dev/nvme0n1" #NVMe info

journalctl -b -p 3 #error log messages

dmesg -l emerg,alert,crit,err
Also, in case things get out of hand, to access GRUB Menu press right Shift if system boots using BIOS or press Esc if system boots using UEFI. Remeber that if you press Esc multiple times then you will enter GRUB command prompt instead.
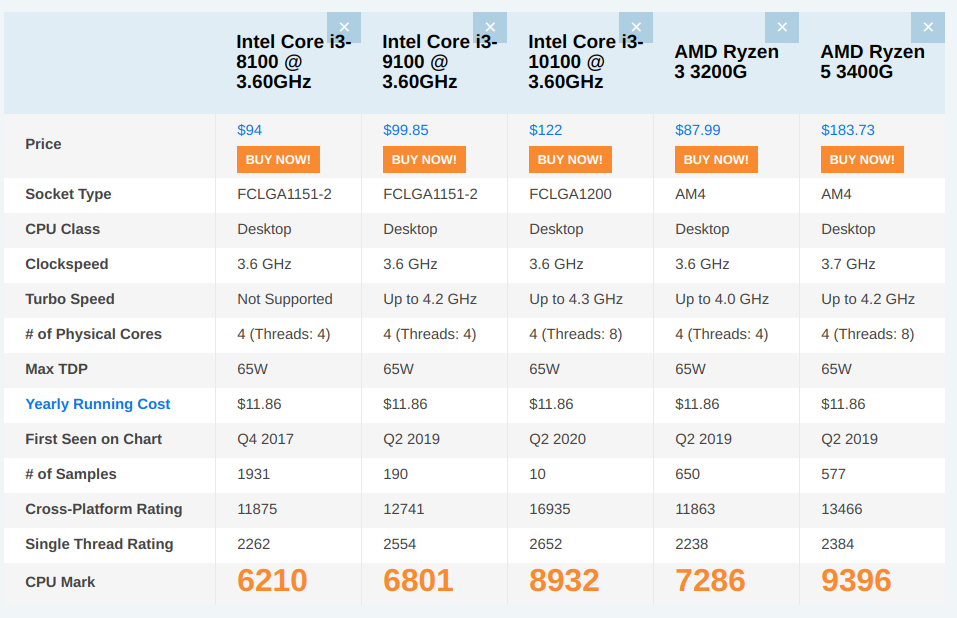
The current AMD budget processors provide a much superior iGPU performance than their Intel counterparts. For example:
We can compare the entry level quad-core desktop processors from last year: Intel Core i3-9100 (MSRP USD 120) has better CPU but worse iGPU than AMD Ryzen 3 3200g (MSRP USD 100) (benchmark).
We can compare the pro level mobile processors from this year: Intel Core i7-10710U with 6-physical cores and hyperthreading, is not better than AMD Ryzen 7 4700U with 8-physical cores but no hyperthreading (comparison).
I decided not to spend extra USD 20 for i3-9100 since the ability of 3200g to allow light gaming would be more than enough for my daily usage. Moreover, since neither of them have hyperthereading/multithreading, I won’t expect much improvement in multitasking. However, Intel being more popular has better support for various hardware (for example, I couldn’t run my monitor via HDMI due to compatibility issue between the motherboard and monitor). Luckily, this time the Realtek ethernet drivers didn’t cause headache with Ubuntu.
This is a comparison of PassMark results (screenshot taken on 26 June 2020, when the prices had dropped due to announcement of next gen processors). PassMark a good measure of server orientated performance, where multiple cores are often simultaneously loaded. However, as seen above, for everyday use Core i3 is better than Ryzen 3.
We can’t deny the fact that, Intel Core i3 9100 would have been a better choice in terms of processing power. Even after the launch of 10th gen CPUs that build would have costed about USD 20 more since though the RAM will be really cheap as only 2400 MHz is supported by i3 (- USD 10), the CPU and motherboard (H310) will remain a little more expensive than the AMD counterparts (+ USD 30). however, by buying HP VH240a instead of Asus VA229HR, I could have saved USD 30, hence keeping the total cost of build USD 650 even with i3 9100. That said, I am happy with my AMD PC since it allows me to do some light gaming as a bonus (which was not the purpose of this PC). AMD build is clearly better than Intel if one plans to play even a single racing/shooting game with an option for overclocking by buying a better motherboard.
]]>Gaurish Korpalgkorpal@math.arizona.eduhttps://www.math.arizona.edu/people/gkorpalPre-COVID Crisis Tech Remedies (Jan 2020)2020-08-01T00:00:00-07:002020-08-01T00:00:00-07:00https://gkorpal.github.io/posts/2020/08/asus-c425-reviewMy quest for buying a cheap lightweight laptop that can run Linux and backup data efficiently.
The laptop that I got when I joined college 5 years ago was now old enough to be replaced. Mostly because I picked the wrong specs when there was a choice (like chose Realtek over Intel NIC, 1x8GB over 2x4GB RAM, and 48Wh over 62Wh battery) and my lack of maintenance (never cleaned dust from inside or the rust from the ports). So I wanted something portable that can allow me to browse internet, write homework assignments in LaTeX (not Overleaf) and backup my data to the cloud. Moreover, I find Windows very irritating to use and prefer Ubuntu. However, due to budget constraints, I couldn’t just buy the USD 1000 Linux friendly laptops like Dell XPS or Lenovo ThinkPad . Fortunately, the university gives free unlimited high-speed WiFi which makes Chromebook a viable option. The best Chromebook available in terms of build quality was the USD 650 Google Pixel Go (m3-8100Y processor) but spending so much money on a chromebook was out of question since ChromeOS is a handicapped version of Linux with limited hardware and software support (just like I had to abandon my lovely Google/Asus Nexus 7 2nd gen tablet because Android stopped getting updates). So I searched for something with specs similar to Pixelbook Go but at lower price (i.e. lower build quality). While searching I stumbled upon Asus Chromebook C425 and bought it without putting much though since it fit my budget of USD 350-400.
Performance
Following is the comparison of tech specs of my new laptop (USD 375 + taxes in Jan 2020) with the older laptop (USD 916 + taxes in Oct 2014) :
Specification
Asus Chromebook C425 (C425T)
Lenovo ThinkPad E440 (Custom build)
CPU
Intel Core m3-8100Y (1.10GHz x 2 cores, Amber Lake Y)
Intel Core i7-4702MQ (2.20GHz x 4 cores, Haswell)
iGPU
Intel UHD Graphics 615 (300MHz, Gen. 9 Amber Lake)
Intel HD Graphics 4600 (400MHz, Gen. 7.5 Haswell)
RAM
Micron Technology 2 x 4GB LPDDR3 1866 MHz SO-DIMM
SK Hynix 8GB PC3-12800 DDR3L SDRAM 1600 MHz SO-DIMM
Storage
64GB eMMC 5.0 HS400 + 100GB Google One for 1 year (later USD 20/year)
Seagate 2.5” 500GB HDD, 7200rpm
Battery
48 Wh
48 Wh
Ports
Audio jack (mic/headphone), 2 x Type-C USB 3.0 (display and power delivery support), Type-A USB 3.0, micro SD card reader
Audio jack (mic/headphone), 2 x Type-A USB 3.0, 1 x USB 2.0 VGA, HDMI, SD card reader (Realtek), Optical drive (PLDS DVD-RW), Lenovo OneLink connector (for docking)
Network
Intel Integrated WiFi 5 (802.11 ac (2x2)) and Bluetooth 5.0
Realtek 8168E Gigabit Ethernet and Realtek 8723BE Integrated WiFi 4 (802.11 n) and Bluetooth 4.0
Sturdy and easy to upgrade (user manual has full details)
I considered this as an upgrade since it offered better mobility and screen. Moreover, before getting the Thinkpad as a gift, I was using the netbook HP Mini 1103 (10.1-inch screen with a single-core 1.66-GHz Intel Atom N455 CPU and 1GB of RAM) with Windows 7 replaced with Lubuntu 14.04. I learned LaTeX on that small computer. Note that hyperthreading might be disabled by default, so you will have to enable it by going to chrome://flags/#scheduler-configuration and changing the option to “Enables Hyper-Threading on relevant CPUs”. You might need to repeat this process after each bi-weekly system update.
The thing which I don’t like about the Chromebook is that the browser uses majority of the available RAM irrespective of how many tabs are open or the total RAM the computer has. Also, one wrong browser extension can lead to random crashes. And the stupidest thing is the lack of local trash/recycle-bin folder just like Android, so deleted files can’t be recovered (i.e. make a Downloads folder on Google Drive instead of using the local drive folder).
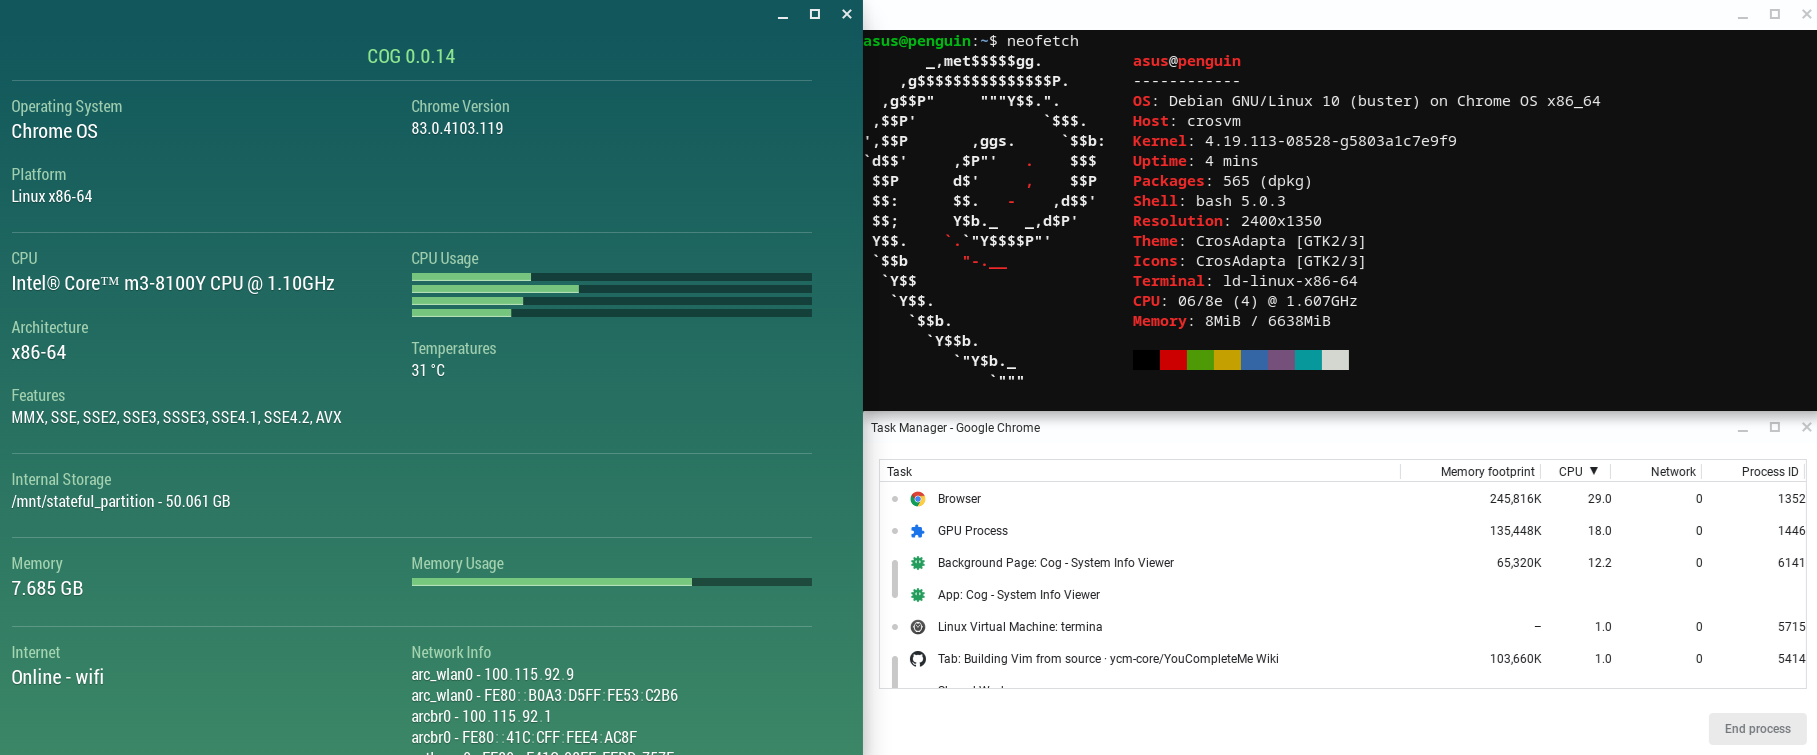
When you are lucky, you might get ideal performance, with hyper-threading active in both ChromeOS and Crostini, along with no CPU hogging by Crostini. Here, the Cog app is showing ChromeOS info, neofetch is showing Linux system info (the CPU identity is not shared with the virtual machine) and System Task Manager shows CPU/RAM usage. (Open image in new tab if it's too small)
LaTeX Setup in Chromebook
I will use the Qt based LaTeX editor TexMaker. Most other LaTeX editors don’t work because they are not allowed to save newly compiled files by replacing the existing ones. The Chrome browser is sufficient for opening other pdf files. I tried using Evince, but it used to crash a lot.
Check that the sandbox (Penguin container/Crostini) is up-to-date. In your browser, go to chrome://components. Under cros-termina, select “Check for update”. If you download an update, you might need to restart your Chromebook.
Open Crostini and make sure that “cros.list” and “sources.list” have the following content (make sure it is “http” and not “https”, otherwise you can get HTTP proxy issues).
   $ cat /etc/apt/sources.list.d/cros.list
   deb http://storage.googleapis.com/cros-packages/83 buster main

   $ cat /etc/apt/sources.list
   # Generated by distrobuilder
   deb http://deb.debian.org/debian buster main
   deb http://deb.debian.org/debian-security buster/updates main
Here “buster” should correspond to the version of Debian installed in Crostini. If it’s not the same, then use the pre-installed version of Vim to edit. If you are not familiar with Vim, run the command vimtutor first and also have a look at this brief intro.
Update the packages: sudo apt update && sudo apt dist-upgrade (there won’t be any password prompts).
Install the basic version of TeX Live: sudo apt install texlive
Install TexMaker: sudo apt install texmaker. Note that the screen resolution might be messed up due to different in system and crostini resolution, however it can be fixed.
Right click on the folder where you want to create the tex files and choose “Share with Linux” and “Available offline”. The folder can also be accessed via cd /mnt/chromeos/GoogleDrive/MyDrive/"PathOfSharedFolderInYourGoogleDrive".
You might get gibberish text when using Linux, in that case you will have to disable GPU-acceleration for the sandbox, this can be done by going to chrome://flags/#crostini-gpu-support and changing the option to “disabled”.
Though ChromeOS gives you an option of making a backup of Chrostini, I would recommend removing Linux before system restart for the version updates (not needed for smaller updates) and then reinstall everything. Many times Linux breaks after system updates and new features are introduced in each version.
The pdfLatex process in this Chromebook can be as slow as in the old netbook (HP Mini 1103) since the Debian runs in a virtual machine and might get limited access to resources due to sandbox restrictions. In particular, hyperthreading for Crostini sometimes get disabled after ChromeOS update, i.e. only 2 cores instead of 4 are available (discussion thread). Therefore, in Crostini the Intel Core m3-8100Y might sometimes perform like Intel Atom N455. However, the most frustrating thing is when the virtual machine starts utilising 200% or more of the CPU (i.e. approximately 100% of more than one of the available cores) even after you have closed it, in which case you will have to go to Task Manager (Search + Esc) and end it there (discussion thread). Best way to deal with these issues is to report bugs and keep system updated.
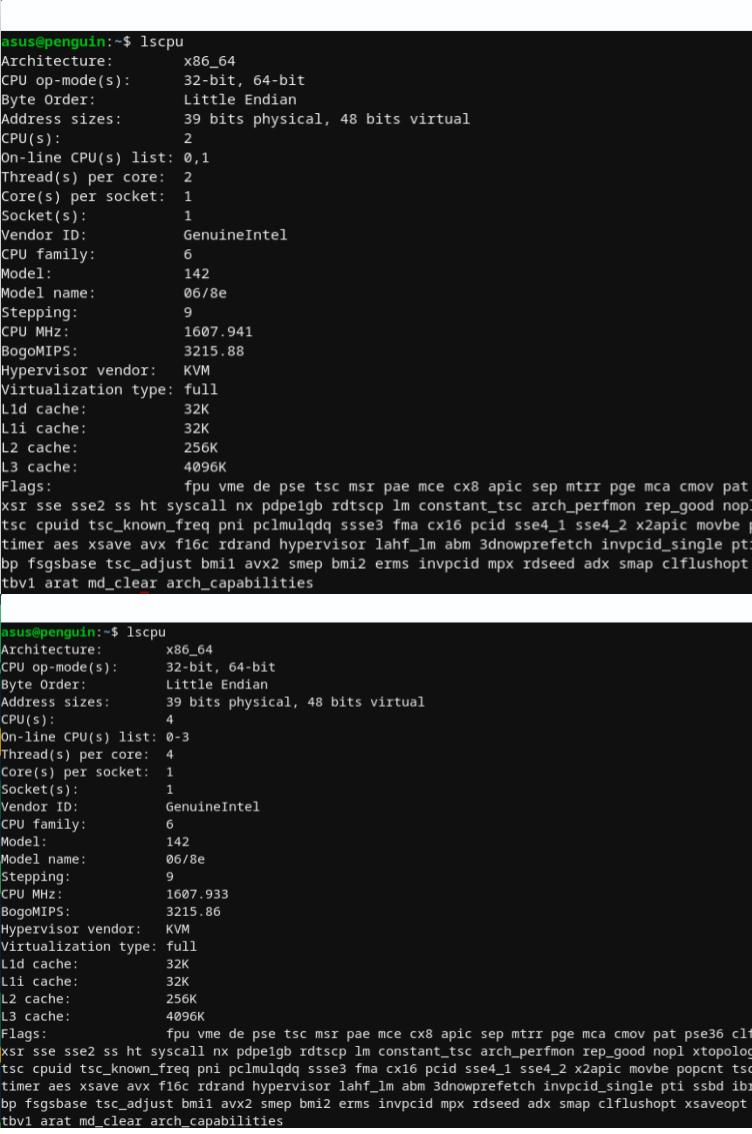
Even with hyperthreading enabled, sometimes the Linux will show only 2 cores. Note that virtual machine is reading the CPU as single core with 2 or 4 threads. Hence, the cache organization is half of the actual value. (Open image in new tab if it's too small)
Build Quality
From what I had read about Chromebook’s lack of basic capabilities (can’t run most softwares, can’t format flash drive to desired format, don’t have SSD, and no compatible with many hardwares like drawing tablet), for USD 400 I expected the build quality of a USD 800 windows laptop. However, just like the Linux capabilities, the build quality was also disappointing.
Quality Parameter
Asus Chromebook C425 (C425T)
Lenovo ThinkPad E440 (Custom build)
Chassis
Metal flap with plastic body. The laptop looks stylish but the hinge design is really bad. Can’t be open with just one hand and it flexes the whole machine a little bit putting strain on the plastic casing. Therefore, the frame started cracking within 2 months of usage and it is not covered under warranty.
Metal flap with plastic body. The laptop looks simple and can be easily openend with one hand. Only the fan grill plastic broke after 5 years of rough usage.
Display
It is a thin and dull display, but with good enough viewing angles. Most probably, because of the uneven distribution of weight on the display hinges the chasis developed cracks.
It was really disappointing. Low viewing angles anf resolution. The Windows 10 looks really horrible on this screen.
Speakers
Really loud and surprisingly good.
They were OK. Had to use over amplify using VLC to make it loud enough.
Keyboard
Makes web browsing very comfortable. When the Chromebook lid swings out for use, the hinge forces the back of the keyboard up, increasing strain on hinge.
This was the best feature about the laptop. I wrote many on my project reports and the master’s thesis on it. Very comfortable.
Trackpad
It is large and responsive. But since it is plastic and the chassis flexes, it can be less responsive some times.
It was ok, but it is the only part of the laptop which deteriorated over time.
Ports
The microSD card slot is a bit inconvenient to use since it lacks cover. Therefore, one needs to remove the card before butting the laptop in the bag otherwise it can get stuck inside.
USB ports became loose and other ports got rusted. Maybe it was because of my lack of care.
Thermals
Due to the lack of fan, multitasking and video calls can make the right side of keyboard really hot to touch (about 55°C).
The laptop had an annoyingly loud fan which ran almost always, but still was too hot to be kept on lap.
Internals
There was coil whining which took some time to get used to.
Easy to upgrade internals, but they should have gone with a better WiFi card.
Introspection
For Linux access, Crostini runs Debian stable which tends to have outdated packages. However, one can easily get the latest version of software by adding Debian Testing to the source list/etc/apt/sources.list using Vim:
deb http://deb.debian.org/debian testing main
Also mark stable release as default by using the following command in terminal:
echo 'APT::Default-Release "stable";' | sudo tee -a /etc/apt/apt.conf.d/00local`
Then one can install the latest package like texlive using
sudo apt -t testing install texlive
Somethings that I overlooked because of the Intel branding is that m3 uses DDR3 RAM, whereas even the modern Intel Pentium, Intel Celeron and AMD A4 use DDR4. Moreover, though getting rid of fan makes the system lighter and quiter, it also bottlenecks the capabilities of the processor. One problem with buying Chromebooks (or other computer poarts) is that their price fluctuates a lot, hence if it wasn’t an emergency I would have waited for better price on alternatives. If mobility was not a concern, then 15” windows laptops with Core i3 or Ryzen 3 dual core processors and SSD, like Acer Aspire 5, Asus VivoBook 15, Dell Inspiron and Lenovo Ideapad were good options. If I knew that we will be teaching for home then Apple iPad Mini would have been a better option.
I will end by quoting the reviews I read before buying this chromebook and ignored the warnings:
I’m not a plastic hater, but there are price brackets I equate to plastics being used, and at MSRP USD 499, I don’t expect a mostly-plastic build. While there isn’t a ton of flex and wobbliness with this chassis, there’s no getting around the way plastic feels under your palms as you actually use a Chromebook. —- Chrome Unboxed
Personally, I don’t mind a plastic bottom. In fact, there are advantages to having a plastic bottom, as plastic is lighter and less heat-conductive than metal. However, a plastic main-deck might be enough of a reason to pay extra for the C434. I mean, the plastic on the C425 is not the poor-quality we’ve used to see on entry-level laptops in the past, but it’s still plastic nonetheless, and doesn’t feel as nice or as sturdy as metal….. That being said, I think there’s better value in the USD 550 Chromebook C434 than in this USD 399 ChromeBook C425, even with less RAM. And if you’re on a tight budget, perhaps consider that ChromeBook C302 first, see if you can live with a smaller screen, but without compromising on the build and the screen. The C425 comes as a third option, if those other two failed to meet your mark due to their higher price or smaller display. —- UltrabookReview.com
The C425’s plastic body has more flex and suffers from a duller-looking, non-touch screen, but the keyboard and trackpad are responsive, the screen is fine for documents and spreadsheets, and it has enough battery life to last a full day of work or classes. —- NY Times- Wirecutter
]]>Gaurish Korpalgkorpal@math.arizona.eduhttps://www.math.arizona.edu/people/gkorpalBicylinder: Steinmetz solid2019-06-16T00:00:00-07:002019-06-16T00:00:00-07:00https://gkorpal.github.io/posts/2019/06/steinmetz-solidConsider the following example from Piskunov’s “Integral and Differential Calculus”:
Find the area of that part of the surface of the cylinder $x^2+y^2=a^2$ which is cut out by the cylinder $x^2+z^2=a^2$.
Here we need to find the surface area $S$ of the part of cylinder $C_1: x^2+y^2=a^2$ which lies inside the cylinder $C_2: x^2+z^2=a^2$. That is, the surface $S$ is bounded by the curve $\Gamma$ traced at the intersection of the two curves.
The generation of a bicylinder created by Ag2gaeh [CC BY-SA 4.0], via Wikimedia Commons. Here the purple line is the curve $\Gamma$, $C_1$ is the red-cylinder and $C_2$ is the blue cylinder. $S$ is the area of surface marked with red lines.
The projection of $\Gamma$ in the $xz$-plane gvies us the domain $D: \{x^2+z^2\leq a^2\}$. Next we consider the part of desired surface in the first octant, and use the following surface area formula:
$\displaystyle{= \int_{0}^a \int_{0}^{\sqrt{a^2-x^2}}\frac{a}{\sqrt{a^2-x^2}}dz dx = a \int_0^a \left[\frac{z}{\sqrt{a^2-x^2}}\right]_0^{\sqrt{a^2-x^2}}dx}$
$\displaystyle{= a\int_0^1 dx = a^2}$
(luckily we don’t need change of variables!)
Hence, $\boxed{S = 8a^2}$. I found this problem to be visually challenging, though the surface area and volume follow directly from the general formulas.
]]>Gaurish Korpalgkorpal@math.arizona.eduhttps://www.math.arizona.edu/people/gkorpalSpace filling curve2019-04-14T00:00:00-07:002019-04-14T00:00:00-07:00https://gkorpal.github.io/posts/2019/04/space-filling-curveIn this post I would like to share my old writeup about there existence of a continuous surjective map from $\mathbb{R}$ to $\mathbb{R}^2$. In other words, we will prove that that Hilbert’s Curve is a continuous surjective map. The proof presented here was explained by Dr. Manas Ranjan Sahoo, 3 years ago on 15th April 2016.
Consider $f : \mathbb{R} \rightarrow [0,1]$
Observe that $f$ is a continuous periodic function with period 2. Hence, $f(x+2I) = f(x)$ for any integer $I$.
Now consider, $g : [0,1] \rightarrow [0,1]\times [0,1]$ where $g(t) = \left(x(t), y(t)\right)$. We define the map $g$ as:
Now this map is continuous from Weierstrass M-test, which states that:
Suppose that $\{f_n\}$ is a sequence of real or complex-valued functions defined on a set $A$, and that there is a sequence of positive numbers $\{M_n\}$ satisfying
\[\forall n \geq 1, \forall x \in A: \ |f_n(x)|\leq M_n \nonumber\]
\[\sum_{n=1}^{\infty} M_n < \infty \nonumber \]
Then the series
\[\sum_{n=1}^{\infty} f_n (x) \nonumber \]
converges uniformly on $A$.
Thus, $g$ is continuous because $f$ is continuous.
Now we will prove that $g$ is surjective, that is, for all $(x_0, y_0)$ in $[0,1]\times [0,1]$ there exist $t_0$ in $[0,1]$ such that $x(t_0) = x_0$ and $y(t_0) = y_0$.
Trick: Represent the elements $t_0$ in ternary and $x_0, y_0$ in binary.
where $\displaystyle{3^n\sum_{i=0}^{n-1} \frac{2a_i}{3^{i+1}}}$ is twice an integer since $3^n \geq 3^{i+1}$ for $0\leq i \leq n-1$ (hence we could take 2 out of summation).
Now $a_n$ can be either 0 or 1. We will consider following two cases:
$a_n = 0$
\[\begin{eqnarray*}
3^n\sum_{i=n}^{\infty} \frac{2a_i}{3^{i+1}} & = & 3^n\sum_{i=n+1}^{\infty} \frac{2a_i}{3^{i+1}} \\
&\leq & 3^n\sum_{i=n}^{\infty} \frac{2}{3^{i+1}} \qquad \text{(substitute maximum value of $a_i$)}\\
& = & \frac{1}{3} \qquad \text{(sum of infinite geometric progression)}
\end{eqnarray*}\]
Also observe that if we substitute minimum value of $a_i$ we will get $0 \leq 3^n\sum_{i=n}^{\infty} \frac{2a_i}{3^{i+1}}$, hence
\[0 \leq 3^n\sum_{i=n}^{\infty} \frac{2a_i}{3^{i+1}} \leq \frac{1}{3} \nonumber\]
\[\Rightarrow f\left(2I+ 3^n\sum_{i=n}^{\infty} \frac{2a_i}{3^{i+1}}\right) = 0 \nonumber\]
from the definition of $f$ given in the starting.
$a_n = 1$
\[\begin{eqnarray*}
3^n\sum_{i=n}^{\infty} \frac{2a_i}{3^{i+1}} & = & \frac{2}{3} + 3^n\sum_{i=n+1}^{\infty} \frac{2a_i}{3^{i+1}} \\
&\leq & \frac{2}{3} + 3^n\sum_{i=n}^{\infty} \frac{2}{3^{i+1}} \qquad \text{(substitute maximum value of $a_i$)}\\
& = & \frac{2}{3} + \frac{1}{3} \qquad \text{(sum of infinite geometric progression)}\\
&=& 1
\end{eqnarray*}\]
Also observe that if we substitute minimum value of $a_i$ we will get $\frac{2}{3}+0 \leq 3^n\sum_{i=n}^{\infty} \frac{2a_i}{3^{i+1}}$, hence
\[\frac{2}{3} \leq 3^n\sum_{i=n}^{\infty} \frac{2a_i}{3^{i+1}} \leq 1 \nonumber \]
\[\Rightarrow f\left(2I+ 3^n\sum_{i=n}^{\infty} \frac{2a_i}{3^{i+1}}\right) = 1 \nonumber\]
from the definition of $f$ given in the starting.
Now combining both the above cases we conclude that:
Thus proving our claim. Therefore, $g$ is surjective.
From standard exercises in metric spaces we know that $[0,1]$ is homeomorphic to $\mathbb{R}$ and $[0,1]\times [0,1]$ is homeomorphic to $\mathbb{R}^2$.
Let $\phi : \mathbb{R} \rightarrow [0,1]$ and $\psi : [0,1]\times [0,1] \rightarrow \mathbb{R}^2$ be the homeomorphisms, then
Thus the composition, $\Gamma = \psi \circ g \circ \phi$ is the required continuous surjective map.
Exercise: Verify that the function $\Gamma : \mathbb{R} \rightarrow \mathbb{R}^2$ defined above will give Hilbert's Curve.